Licensing
将 Spine 官方运行时整合到自建应用程序中需要持有 Spine 许可证.
安装
安装spine-unity运行时前提条件是必须有一个可以添加spine-unity运行时的活动Unity项目.
- 下载并安装 Unity.
- 在Unity Editor中创建一个空白的新项目.
有多种安装方式可将spine-unity运行时添加到Unity项目中:
使用Unitypackage安装运行时
你可以用spine-unity unitypackage将 spine-unity 运行时安装到Assets文件夹中.
- 下载 最新的spine-unity unitypackage.
- 导入该unitypackage (双击它或者将其拖进Unity项目面板便可让Unity自动导入).
最新的spine-unity unitypackages可在 Spine Unity 下载页中下载.
通过Git安装运行时
除 unitypackage 安装方式外, 还可以通过 Git 按以下步骤获取最新的更改.
- 克隆 spine-runtimes Git 存储库.
- 将
spine-runtimes/spine-unity/Assets/中的全部文件拷贝到项目中的Assets/文件夹里. - 将
spine-runtimes/spine-csharp/src中的全部文件拷贝到项目中的Assets/Spine/Runtime/spine-csharp文件夹里.
使用Unity包管理器安装运行时
最后一种方式是通过 Unity 包管理器来安装和更新 spine-unity 运行时.
如果你的 Unity 版本比较新且您的 Unity 包管理器有 Add package from git URL... 选项, 便可直接使用以下 URL 添加这三个包:
https://github.com/EsotericSoftware/spine-runtimes.git?path=spine-csharp/src#4.2https://github.com/EsotericSoftware/spine-runtimes.git?path=spine-unity/Assets/Spine#4.2https://github.com/EsotericSoftware/spine-runtimes.git?path=spine-unity/Assets/Spine Examples#4.2
最新的Unity 包管理器URL也可在 Spine Unity 下载页中找到.
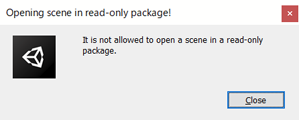
Spine Examples包中的示例场景需要使用系统的文件管理器(比如 Windows Explorer 或 Mac Finder)将场景文件从包目录中复制到你自己项目的Assets目录. 现在已知 Unity 中的一个bug会导致如果直接打开通过 git URL 下载的包中的场景, 则将出现"Opening scene in read-only package!"错误:
详细步骤
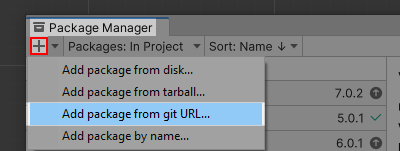
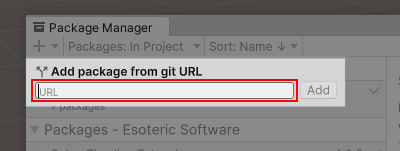
在Unity中打开 Package Manager (点击Unity的 Window > Package Manager 即可打开). 点击 + 图标后选择 Add package from git URL..., 然后分次输入上文中的三条git URL(或从spine-unity下载页面复制URL)来安装这三个包. URL中的 #4.2 指定了运行时版本, 你可以将其改为为具体的git commit哈希值(比如#5e8e4c21f11603ba1b72c220369d367582783744) 来确保项目中每个成员的软件版本完全一致. 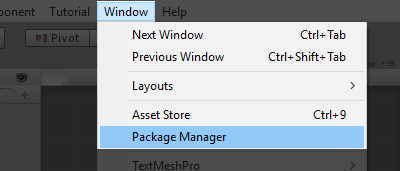
 这时
这时 Package Manager 窗口将列出已添加的条目.  在
在 Project 面板的 Packages 下可以看到 spine-unity Runtime 和 spine-unity Runtime Examples 条目. 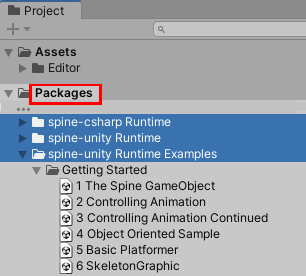 如果条目还未在
 Project 面板中列出, 重启一下Unity就能刷新.
可选的UPM扩展包
spine-unity运行时无需额外的插件即可独立工作. 因此某些可选功能, 比如时间轴或通用渲染管线(URP)将会通过单独的Unity Package Manager(UPM, Unity包管理器)扩展包提供.
为何将这些功能独立为扩展包
Unity已将大量的可选插件迁移至新的Unity Package Manager(UPM)软件生态. 例如, 其通用渲染管线(URP)的着色器文件也是通过UPM的 Universal RP 包提供的, 而非直接包含在每个新建的Unity项目中.
如果没有安装Unity的 Universal RP 包, 那么引用spine-unity运行时中的Universal RP Spine shaders会报一大堆错误信息并需要额外配置才能恢复正常. 因此把Universal RP Spine shaders打包为UPM包, 便可自动厘清和解决这类Unity的Universal RP包未引入项目问题中的依赖关系, 使这些拓展功能更易使用.
安装
有两种安装UPM扩展包的方式:
A - 下载UPM包
- 在spine-unity下载页面中下载所需的UPM包, 你也能在Git仓库的spine-unity/Modules子目录下找到它们.
- 若已打开了某个Unity项目, 建议你关闭当前全部包含了Spine组件的场景(你可以新建一个空场景来执行安装流程).
- 在解压或克隆源文件后, 你可以通过以下两种方式之一引入这个软件包:
- a) 复制到你的项目中
把包中的文件全部复制到你项目中的Packages目录下. Unity就会自动加载它. - b) 用UPM包管理器导入
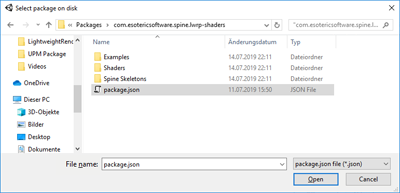
把包中的文件全部复制到Assets目录以外的任何地方, 然后在Unity中打开Package Manager(Window > Package Manager), 选择+图标, 单击Add package from disk..., 找到并选中package.json文件. 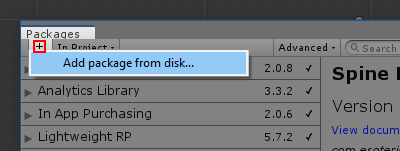
 这时
这时 Package Manager将列出这个Spine Lightweight RP Shaders包: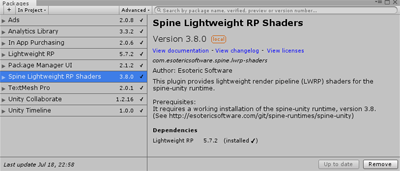 同时
同时 Spine Lightweight RP Shaders包也将出现在Project面板中的Packages文件夹下: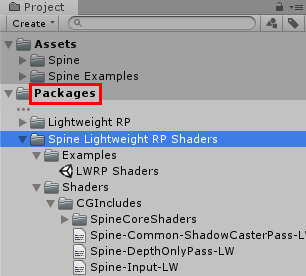 如果
如果 Project面板中没有出现该软件包, 那么你需要重启一下Unity.
- a) 复制到你的项目中
- 要添加 UPM 包(比如 Spine URP Shaders UPM 包)中的示例场景的话, 第一步是在UPM中选中该包, 然后展开
Samples并点击Import即可导入.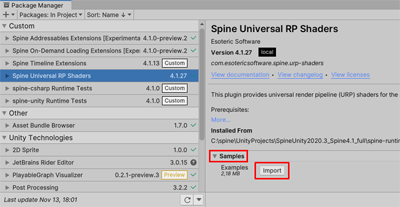
B - 通过git URL添加包
如果你的Unity版本比较新, 且你的Unity包管理器也提供了 Add package from git URL... 选项, 那么便可直接使用git URL来添加包.
重要提示: 当从git URL安装
URP Shaders UPM package时, 也必须要通过Unity包管理器安装spine-csharp和spine-unity包, 而不能用unitypackage安装到Assets文件夹. 后一种做法会导致URP Shaders UPM package中着色器的文件引用路径会指向一个不存在的spine-unity包目录, 从而导致着色器编译报错.
- 在spine-unity下载页面中找到所需UPM软件包的git URL.
- 若已打开了某个Unity项目, 建议你关闭当前全部包含了Spine组件的场景(你可以新建一个空场景来执行安装流程).
- 打开Unity的
Package Manager(点击Window > Package Manager), 选择+图标, 点击Add package from git URL..., 然后输入从spine-unity下载页面找到的git URL. 比如https://github.com/EsotericSoftware/spine-runtimes.git?path=spine-unity/Modules/com.esotericsoftware.spine.urp-shaders#4.2. URL中的#4.2指定了运行时版本, 你可以将其改为为具体的git commit哈希值(比如#5e8e4c21f11603ba1b72c220369d367582783744) 来确保项目中每个成员的软件版本完全一致. 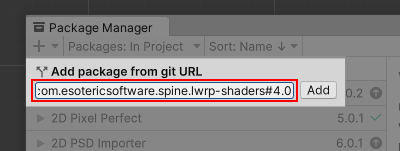 这时
这时 Package Manager将列出这个Spine Lightweight RP Shaders包: 同时 Spine Lightweight RP Shaders包也将出现在Project面板中的Packages文件夹下: 如果 Project面板中没有出现该软件包, 那么你需要重启一下Unity. - 要添加 UPM 包(比如 Spine URP Shaders UPM 包)中的示例场景的话, 第一步是在UPM中选中该包, 然后展开
Samples并点击Import即可导入.
旧版UPM包注意事项:
旧版本的 UPM 包在正常的包文件夹中直接包含了示例场景. 要打开包中的示例场景需要使用系统的文件管理器(比如 Windows Explorer 或 Mac Finder)将场景文件从包目录中复制到你自己项目的Assets目录下. 现在已知 Unity 中的一个bug会导致如果直接打开通过 git URL 下载的包中的场景, 则将出现"Opening scene in read-only package!"错误:
示例
你可以按如下步骤探索spine-unity运行时的附带示例场景:
- 下载并安装 Unity.
- 在Unity编辑器中创建一个新的空项目.
- 下载 最新的 spine-unity 组件包并导入它. 你也可以按上文 安装 一节中所述的方法, 使用Git或Unity包管理器获取最新版本.
- 在Unity 编辑器中打开项目, 然后在Project面板中查看
Spine Examples/Getting Started文件夹中的各个示例场景. 每个示例场景都自带运行说明和文字描述.
在 Unity 编辑器中打开项目并选择 Assets -> Open C# Project 就能检查和修改示例场景和 spine-unity 运行时本身的 C# 代码. 更多关于示例场景的信息详见示例场景一节.
更新spine-unity运行时
升级指南
在更新项目中的spine-unity运行时前, 请先阅读我们的 Spine编辑器和运行时版本管理指南.
请注意: 用Spine 4.1或更早的版本导出的Json和二进制skeleton数据文件 无法 被spine-unity 4.2运行时读取! 升级运行时后必须用Spine 4.2重新导出Skeleton数据文件.
如果你有大量项目需要重导出资产, 我们建议你按 该节内容 所述来自动化项目文件的导出.
例如, 可以使用该脚本来导出所有的Spine示例项目并创建texture atlas: export.sh
从spine-unity 3.6、3.7、3.8、4.0或4.1升级到最新版本时, 请参考如下升级指南:
- spine-unity 3.6 to 3.7 升级指南
- spine-unity 3.7 to 3.8 升级指南
- spine-unity 3.8 to 4.0 升级指南
- spine-unity 4.0 to 4.1 升级指南
- spine-unity 4.1 to 4.2 升级指南
- spine-unity 4.2 to 4.3 升级指南
建议遵循以下步骤来消除升级过程带来的潜在问题:
- 和更新Unity时一样, 在更新运行时前应备份整个Unity项目.
- 在更新Spine运行时前, 一定要与你的主程和TA做好确认. Spine运行时是开源的, 并允许用户根据不同的项目需求进行修改. 你项目中的Spine运行时可能已经被程序员修改过了. 在这种情况下, 更新到最新的运行时也需要将这些修改重新同步到新版本运行时中.
- 读一读unitypackage或 github 中包含的
CHANGELOG.md文件. 当函数废弃了旧方法转而使用新方法时, 可以在这个文档里找到相关的描述.
一旦你确定要更新到最新的spine-unity运行时后, 你可以按安装运行时时所采用的方式来更新spine-unity.
使用Unitypackage更新运行时
- 下载 最新的 spine-unity unitypackage. 你也可以用Git从 spine-runtimes Git 仓库 拉取最新版本.
- 关闭Unity编辑器和 Visual Studio/Xcode.
- 当进行版本更新时(比如从 3.7 升级到 3.8), 应从项目的spine-unity安装目录:
Assets/Spine和Assets/Spine Examples目录中删除旧版运行时文件. - 在Unity编辑器中打开该项目. 如果你已经删除了旧版的spine-unity运行时, 请忽略掉此时控制台中的报错信息.
- 导入最新的unitypackage (双击它便可让Unity自动导入).
- 版本更新后, 务必在项目面板上
右键点击 - Reimport All来重导入skeleton资产. 如果不希望重导入所有资产, 可在项目面板中找到某个你想重导入的某个Spine skeleton资产所在的文件夹, 右击该文件夹再选择Reimport也可达到同样的效果.
通过Git更新运行时
- 从 spine-runtimes Git 仓库拉取最新改动便能获取最新的 spine-unity 运行时.
- 当进行版本更新时(比如从 3.7 升级到 3.8), 应从项目的spine-unity安装目录:
Assets/Spine和Assets/Spine Examples目录中删除旧版运行时文件. - 将
spine-runtimes/spine-unity/Assets/中的全部文件复制到你项目的Assets/文件夹下. - 将
spine-runtimes/spine-csharp/src文件夹复制到你项目的Assets/Spine/Runtime/spine-csharp文件夹下.
请注意: spine-unity运行时基于通用的 spine-csharp 运行时. 请务必在 GitHub 上关注spine-unity和spine-csharp运行时的更新.
通过Unity包管理器更新运行时
如果你已经用 Add package from git URL 选项从远程git URL导入了spine-unity运行时包, 那么也可以用Unity软件包管理器来更新这些软件包.
在Unity中打开 Package Manager (点击 Window > Package Manager), 然后选中这三个包:
spine-csharp Runtimespine-unity Runtimespine-unity Runtime Examples
然后点击 Update 按钮即可从git的指定分支中重新下载最新版本.
要注意的是如果你的URL以 #4.2 结尾, 如https://github.com/EsotericSoftware/spine-runtimes.git?path=spine-csharp/src#4.2, 那么它将从git仓库的 4.2 分支中下载最新版本.
更新UPM扩展包
当需要升级 可选的UMP扩展包 时:
- 原则上与更新Spine Unity运行时步骤无异.
- 如上文所述, 建议在更新前备份整个Unity项目.
和安装方式相对应地, 也有两种更新扩展包的方式:
A - 就地更新
- 如果你已经打开了Unity项目, 那么建议你 a) 关闭Unity, 或者 b) 关闭任何包含Spine组件的场景(例如, 另外新建一个空场景).
- 将新UPM包zip文件解压到到当前运行时目录中, 或将git目录的中的文件复制到当前版本的运行时目录中, 覆盖全部文件. 由于安装UPM包的方式各不相同, 覆盖文件的目标目录可能是你项目中的
project_root/Packages/package_name目录, 也可能是你当时用Add package from disk..选项来加载UPM包的目录, 它可以是除Assets目录外的任意目录. - 如果你已经关闭了Unity, 则在Unity中重新打开你的项目.
- Unity将会自动导入新资产并显示一个加载进度条.
B - 通过git URL添加包
如果你已经用 Add package from git URL 选项从git URL远程添加了spine-unity运行时, 那么就可以用Unity软件包管理器来更新这些软件包. 在Unity中打开 Package Manager (点击 Window > Package Manager), 选中需要升级的软件包, 然后点击 Update 按钮即可从git的指定分支中重新下载最新版本. 注意, 如果你的URL以 #4.2 结尾, 如https://github.com/.../Modules/com.esotericsoftware.spine.timeline#4.2, 它将从git仓库的4.2分支中下载最新版本.