Licensing
将 Spine 官方运行时整合到自建应用程序中需要持有 Spine 许可证.
资产
导出Unity可用的Spine资产
资产导出用户指南
你可以在 Spine 用户指南中找到完整说明以便:
Spine Unity 基础导出流程
以下步骤展示了一种为 Unity 导出 Spine 资产的最简方法. 在熟悉了基础流程后便可优化你的设置, 以便提升导出效果:
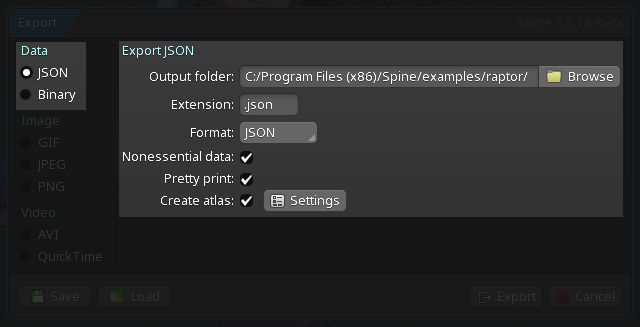
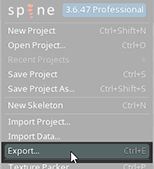
- 在 Spine 中做完了 skeleton 和动画后, 单击
Spine Menu>Export...(CTRL+E). 这时会打开 Export window.
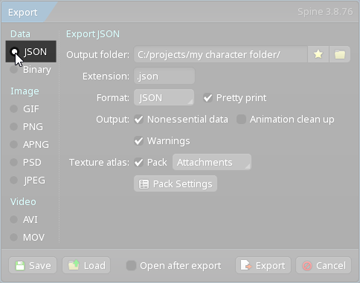
- 选择导出窗口左上方的
JSON选项.
请注意: 实际生产实践中建议使用二进制格式的 skeleton而非JSON格式, 因为它文件尺寸更小而且加载更快.
-
勾选
Texture Atlas的Pack复选框. (也推荐新手同时勾上Nonessential data,Pretty print). 确保不要启用Animation cleanup, 否则将不会导出pose对应的关键帧(keys).
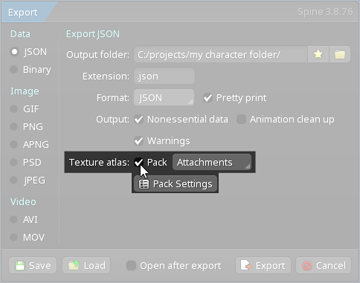
-
单击
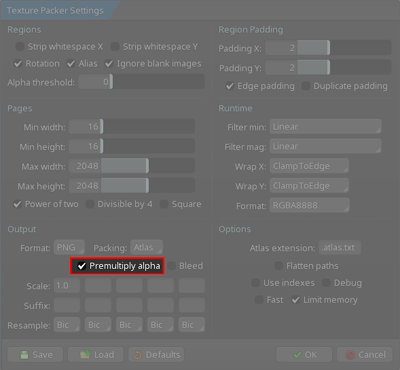
Pack复选框下面的Pack Settings. 这会打开 Texture Packer Settings 窗口. -
左下角的
Atlas extension文本框内应设置为.atlas.txt.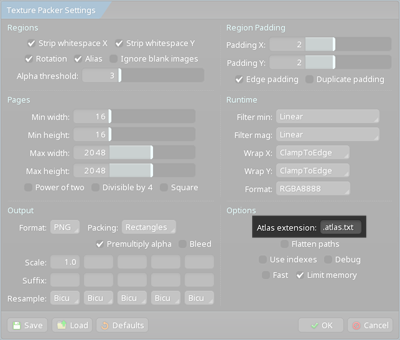
-
对于 spine-unity 4.3 及更高版本: 请禁用
Premultiply alpha并启用Bleed选项.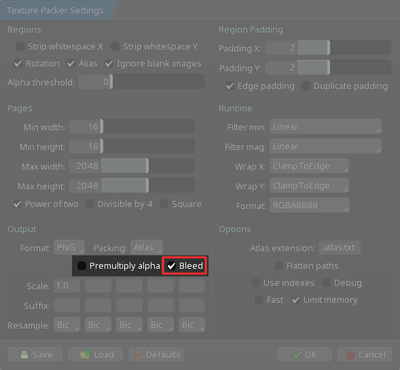
-
这样texture打包器的设置就完成了. 可以点击
OK关闭该窗口. -
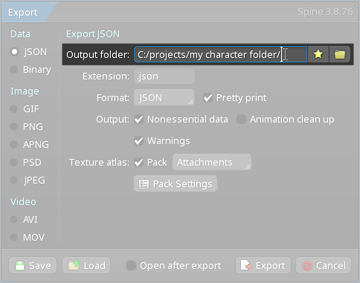
在 Export window 中选择输出文件夹的位置. (推荐新建一个空文件夹来保存导出文件.)
-
单击
Export.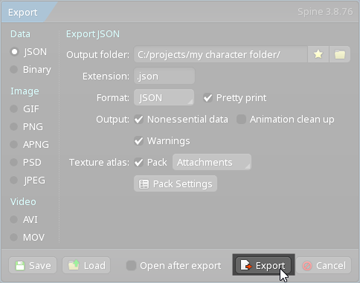
-
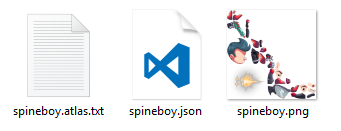
这时会输出以下三个文件:
-
skeleton-name.json或skeleton-name.skel.bytes, 其中包含了skeleton和动画数据. -
skeleton-name.atlas.txt, 保存的是texture atlas的信息. -
单个或数个
.png文件, texture atlas中的一页就对应着这样一个文件, 而texture atlas则包含了skeleton所需的全部图片. -
后续步骤请按 在Unity中导入Spine资产 一节操作.
导出用于Unity的二进制格式
以二进制格式而不是JSON格式导出资产, 会使导出文件的体积更小加载更快.
以下步骤展示了改为导出二进制spine-unity资产的方法. 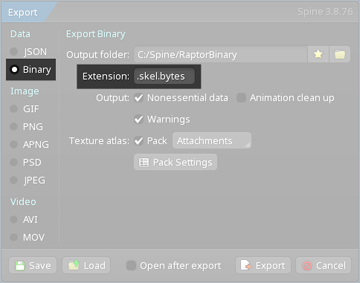
- 在导出窗口的左上角选择
Binary而非JSON. - 将
Extension置为.skel.bytes.
请注意: spine-unity无法加载扩展名为
.skel的文件. 务必使用扩展名.skel.bytes.
进阶操作 - 自动化导出
如果你有大量项目需要重导出资产, 建议使用 Spine 命令行界面(CLI)来自动化skeleton和atlas资产的导出操作. 这可免去繁重易错的手动导出流程, 并且若决定升级到新的 Spine 版本, 也能轻松地一次性重导出所有项目资产.
这里是一个使用CLI导出的示例.
举例来说, 可以使用这个脚本来导出所有的 Spine 示例项目并创建texture atlases: export.sh
进阶操作 - 单页Texture Atlas导出与SkeletonGraphic
一般来说, 建议尽可能使用single-texture (即单页texture) atlas以减少由额外子网格(submeshes)导致的绘制调用(draw call)次数. 对于 SkeletonGraphic来说尤其如此. 由于Unity CanvasRenderer 组件本身的限制, SkeletonGraphic 在默认情况下只能使用单页texture. 此时你可以在 SkeletonGraphic 的组件检查器中启用 Advanced - Multiple CanvasRenderers, 这样便能给每个子网格生成一个带 CanvasRenderer 的子 GameObject 来支持多张texture. 不过出于性能方面的考虑, 最好尽可能地避免这样做. 因此这意味着在UI中使用的Skeletons应被打包成一个single-texture (单页) atlas, 而非多页atlas.
如果这些textures塞不进一个单页atlas, 也可以 按文件夹来分组打包texture atlas页. 这样就能确保每个皮肤只用一个atlas页.
当图片正确分组在各个文件夹中后, 可以通过以下步骤导出skeleton:
- 按
Ctrl+E或在下拉菜单中选择Export... - 启用
Texture AtlasPack并选择Image Folder, 不要选右侧的Attachments. - (可选步骤) 确保
Pack Settings的Options右下没有启用Flatten Paths和Combine Subdirectories(默认为该值). - 点击导出按钮.
Atlas Texture 工作流
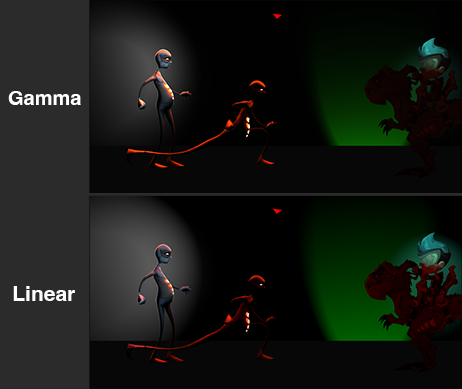
Unity 中的线性与伽马色彩空间
重要提示: 在立项初期就敲定色彩空间是至关重要的, 因为这会大幅影响 blend 的效果. 它不仅影响 alpha-blending 和半透明部件, 也会影响用于特殊效果的 additive, multiply 和 screen 的 blending. 此外, 项目使用的色彩空间还决定了你该如何从 Spine 编辑器中导出 Atlas texture资产.
Unity 的新项目默认为线性(Linear)色彩空间. 然而, 许多 Spine 用户使用的是在 Photoshop 等外部编辑器中经过精心分层和色彩校正后的 2D 资产, 这些图像编辑器则会默认使用伽马(Gamma)空间进行 blend. 这会使 blend 后的颜色在 Unity 中看起来更暗、饱和度更低, 与原设计效果不符且令人失望.
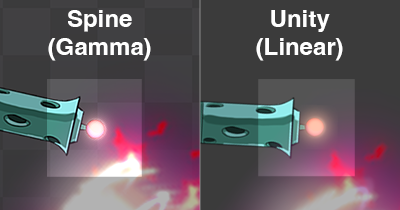
因此建议将项目切换为伽马色彩空间, 以获得更直观、更贴近原设计的 blend 效果.
不过, 线性色彩空间仍然适用于 Unity 项目————特别是当你在具有动态光照的写实 3D 环境中使用 Spine skeleton 动画时.
伽马色彩空间的优势
- Blend 行为更直观 (因为图像编辑器默认在伽马空间下执行 blend).
- 在各种图像编辑器中提前创作资产和预览效果时更友好.
- 可以使用 PMA textures, 从而获得更好的 mipmapping 效果.
线性色彩空间的优势
- 3D 光照: 依赖计算角度获得的光衰减(在 2D skeleton 上是通过法线贴图实现的)更符合物理规律.
- 在以 additive 方式叠加光照图层时, 各像素的光照值会以写实物理的方式累加. (而这未必是你想要的效果)
- 后处理特效在线性色彩空间下才能实现最佳效果.

你可以通过 Edit - Project Settings (Mac 上是 Unity - Project Settings) Player - Other Settings - Color Space 来切换 Unity 项目的色彩空间.
Spine 编辑器的色彩空间
Spine 编辑器默认使用伽马(Gamma)色彩空间, 但你可以在 Spine - Settings - Viewport 中将其切换为线性(Linear)色彩空间.
一旦你敲定了 Unity 项目所用的色彩空间, 强烈建议同步调整 Spine 编辑器设置使其与 Unity 项目保持一致, 以确保渲染结果一致性.
Premultiplied和Straight Alpha导出
Spine的Texture Packer有两种导出texture atlas的基本工作流:
- Straight alpha (使用线性色彩空间时必选)
Texture Packer 设置: 禁用 Premultiply alpha, 启用Bleed. - Premultiplied alpha (PMA) (Spine 编辑器的默认值, 适用于伽马色彩空间)
 Texture Packer 设置: 启用
 Premultiply alpha
如何选择正确的工作流:
- 如果你不确定应使用哪种色彩空间 或以后可能在线性与伽马色彩空间之间切换: 请使用 straight alpha 工作流, 因为它兼容两种色彩空间.
- 如果你确定只使用伽马色彩空间: 请使用 premultiplied alpha (PMA) 工作流, 因为它能在半透明区域提供更佳 mipmap 质量, 其图像细节更锐利清晰.
Unity 的新项目默认为线性(Linear)色彩空间, 然而 premultiplied Alpha (PMA) texture 与线性色彩空间并不兼容(从伽马空间转换到线性空间时会导致边缘显示异常). 详情请见 Unity 中的线性与伽马色彩空间 一节.
导出和导入设置的互相匹配至关重要, 请同时关注 Premultiplied 和 Straight Alpha 导入 一节, 详细了解Unity中正确的导入设置.
在Unity中导入Spine资产
- 在Unity编辑器中打开一个已集成了spine-unity运行时的Unity项目, 步骤可见 运行时安装 一章所述内容.
- 打开存放导出文件(
.json,.atlas.txt和.png)的文件夹. - 将导出的文件(或包含它们的文件夹)复制到项目中的
Assets文件夹下. 从Windows资源管理器/ Mac Finder将导出的文件拖到Unity的项目面板中的某个文件夹下也可以.
spine-unity运行时在检测到文件添加后会自动生成Unity所需的资产文件.
自动生成具体会产生以下资产: 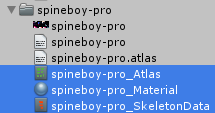
- 一个代表texture atlas文件 (
.atlas.txt)的 _Atlas 资产文件. 它包含对 material (材质)和.atlas.txt文件的引用. - 一个代表各 texture atlas页 (
.png) 的 _Material 资产文件. 它包含对着色器和.pngtexture的引用. - 一个存储了skeleton数据 (
.json,.skel.bytes) 的 _SkeletonData 资产文件. 它包含了对.json或.skel.bytes文件的引用以及对自动生成的 _Atlas 资产的引用. 它还可以自定义的skeleton导入和设置skeleton动画, 具体内容详见 Skeleton Data 资产 一节.
Premultiplied和Straight Alpha导入
如前文 Premultiplied和Straight Alpha导出 一节中所述, Spine提供了两种atlas texture导出的基本工作流:
- Straight alpha (使用线性色彩空间时必选)
- Premultiplied alpha (PMA) (默认为该选项, texture会在Gamma色彩空间中进行premultiply)
通过自动导入首选项来确保导入正确
重要提示: texture 导入设置和 material 设置必须与 atlas texture 的导出设置完全匹配. spine-unity 运行时在 Unity 的 Preferences 窗口中提供了 Spine 首选项 页面, 可通过 Preferences 的 Edit - Preferences(Mac上是 Unity - Preferences ) 选项找到该页, 其中的自动导入(Auto-Import)设置用于确保正确导入.
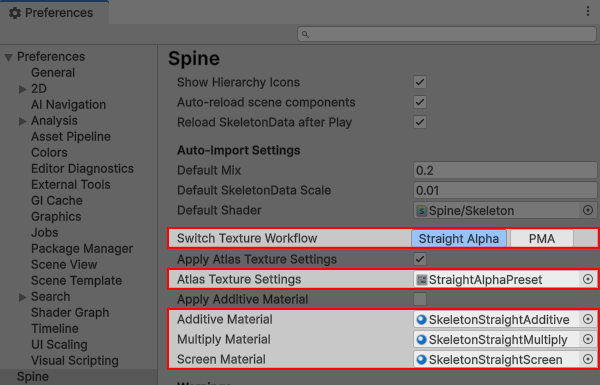
- 自 4.3 版本起, Spine 首选项中新增了
Switch Texture Workflow按钮, 可一键在Straight Alpha和PMA工作流之间切换, 从而自动填入以下第 (2) 和 (3) 项中的配置, 免去繁琐的手动操作. - Atlas Texture Settings 参数设置了如何在导入 atlas texture 后自动应用正确的 texture 导入设置. 当切换了工作流之后便应更改该预设.
Additive Material,Multiply Material和Screen Material定义了每种 blend 模式的 material 模板. 当切换了工作流之后也应更改该预设.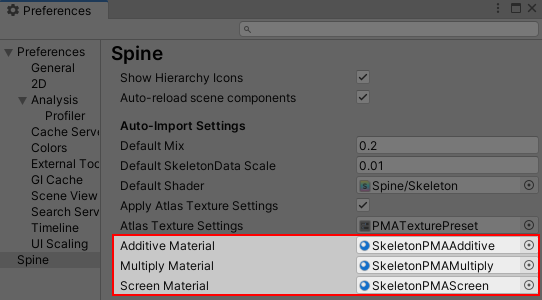
对于 straight alpha 工作流 (spine-unity 4.3 及以上版本的默认值):
- a) 使用
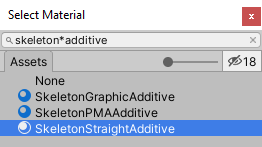
Switch Texture Workflow-Straight Alpha按钮可一键切换至此预设. - b) 亦可手动将
Atlas Texture Settings置为StraightAlphaTexturePreset, 并同时将 blend 模式 materials 置为SkeletonStraightAdditive,SkeletonStraightMultiply和SkeletonStraightScreen.
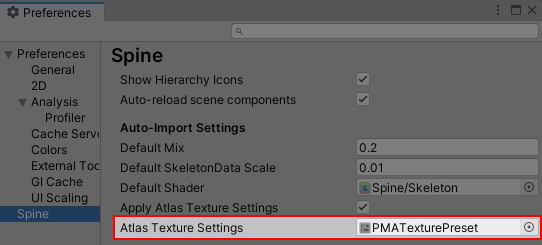
对于 premultiplied alpha (PMA) 工作流 (仅用于伽马色彩空间):
- a) 使用
Switch Texture Workflow-PMA按钮可一键切换至此预设.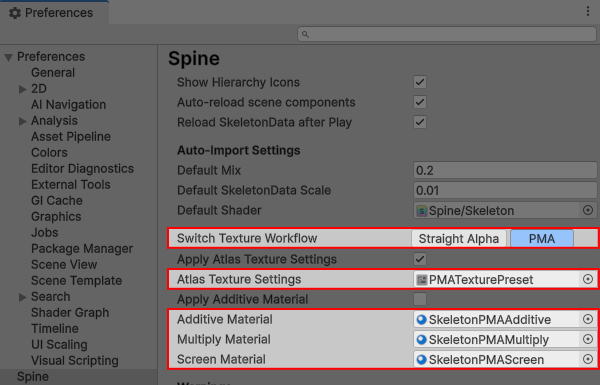
- b) 亦可手动将
Atlas Texture Settings置为PMATexturePreset, 并同时将 blend 模式 materials 置为SkeletonPMAAdditive,SkeletonPMAMultiply和SkeletonPMAScreen. 这是 spine-unity 4.2 及以下版本的默认值.
你也可以创建一套自定义的 TextureImporter Preset 资产和 blend 模式 material 模板, 并分配于此处. 建议在命名时包含 PMA 或 Straight 字样来清晰地区分其适用的 blend 模式.
如果你看到透明区域围有暗框, 或者图片附件边缘出现彩条, 这就很可能就是导入设置有误所致.
标准的 Texture Packer 导出和 Texture 及 Material 导入设置的组合:
- Straight Alpha
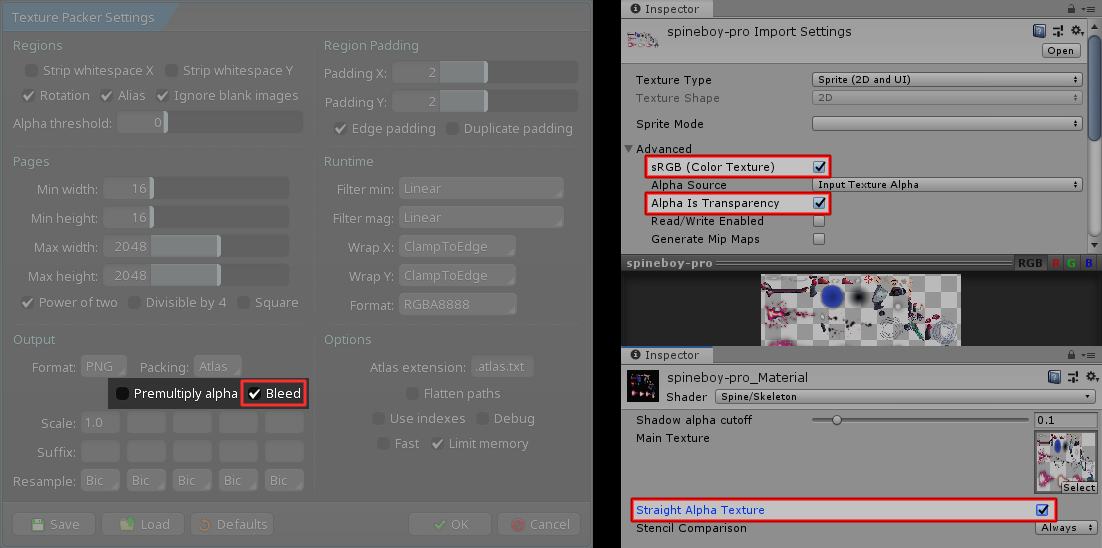 Texture Packer 设置中禁用
 Premultiply alpha, 启用Bleed,
Unity Texture 设置中启用sRGB (Color Texture)和Alpha Is Transparency,
Unity Material 参数中启用Straight Alpha Texture.
如何你尚不熟悉 Spine 导出设置, 请务必先阅读 Atlas Texture 工作流 和 Spine Unity 基础导出流程 两小节.
- Premultiplied Alpha
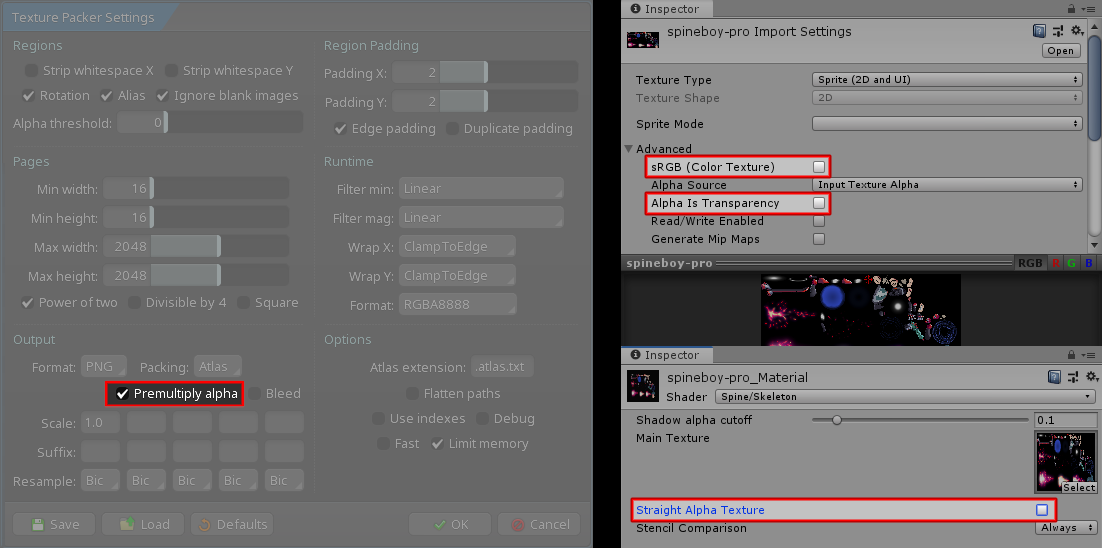 Texture Packer 中启用
 Premultiply alpha,
Unity Texture 设置中禁用sRGB (Color Texture)和Alpha Is Transparency,
Unity Material 参数中禁用Straight Alpha Texture.
请注意: 过去曾建议为所有 PMA textures 启用
sRGB (Color Texture)选项, 但我们发现在启用Generate Mip Maps后, 该配置会产生接缝白边(white seams)这类视觉瑕疵. 为避免此类问题, 且在伽马色彩空间中禁用 sRGB 并无负面影响, 现在我们推荐在 PMA textures 上禁用sRGB (Color Texture).
默认设置:
- Spine 编辑器: Texture packer 默认为 premultiplied alpha (即启用
Premultiply alpha). - spine-unity 4.3 及以上版本: 导入设置默认为 straight alpha 工作流.
- spine-unity 4.2 及以下版本: 导入设置默认为 premultiplied alpha 工作流.
spine-unity 运行时自带的 Spine 着色器两种工作流都支持, 只需确保使用 straight alpha textures 时为 material 启用 Straight Alpha Texture. 而使用 premultiplied alpha textures 时禁用此选项即可.
在 straight alpha 和 PMA 工作流之间切换时, 请务必遵循上述指南, 全面地配置全部 texture 导入设置和 material 参数, 以保持资产的导出设置、导入设置与渲染设置间的一致性. 此外可在此处验证或修改 Unity 项目的色彩空间: Project Settings - Player - Other Settings - Color Space.
导入的故障排除步骤
你将Skeleton导入Unity时如果遇到错误, 那么其原因可能五花八门异彩纷呈, 从Spine导出设置有误到Unity中设置不对都有可能. 因此可参考以下视频, 它将帮助你解决导入过程中出现的常见问题, 并展示应如何正确设置导入导出参数.
进阶操作 - 将Unity SpriteAtlas作为Atlas Provider
请注意: 我们推荐你采用标准的Spine工作流, 并使用Spine的sprite atlases而非Unity的
Sprite Atlas资产. Spine atlases提供了更好的打包能力, 支持多页atlas且健壮性更高. 因此只有当你实在无法使用正常Spine工作流时, 再考虑将UnitySprite Atlas资产作为atlas provider. 真到这时候你还有个路子: 在运行时将一组皮肤中用过的texture区域重打包为单页atlas texture.
使用Unity的 SpriteAtlas 作为atlas provider, 它能替代使用 .atlas.txt 和 .png 文件的skeleton数据文件. 需要使用 Spine SpriteAtlas Import 工具窗口进行资产导入, 该工具位置在 Window - Spine - SpriteAtlas Import.
![]()
准备 Sprite Atlas 的步骤如下:
- 使用
Assets - Create - Sprite Atlas菜单创建Sprite Atlas. - 在
Sprite Atlas检查器中添加Sprites文件夹, 这些Sprites将作为Objects for Packing的附件. - (a) 在Unity 2018.2 之前的版本中, 请手动禁用
Tight Packing并启用Read/Write Enabled.
(b) 在Unity 2018.2 及后续版本中, Unity会自动设置这些参数.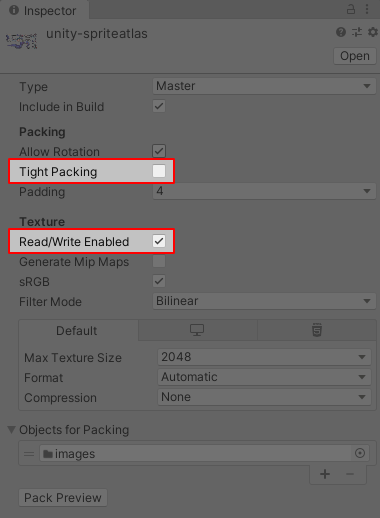
- 在新的
Spine SpriteAtlas Import窗口中将Sprite Atlas资产分配到Sprite Atlas属性上. Unity会自动生成其所需的资产.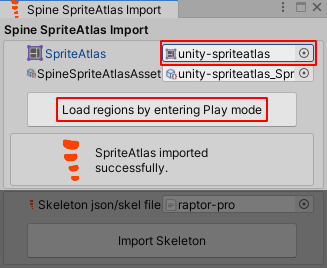
- 点击
Load regions by entering Play mode进入Play模式然后退出该模式, 这样便可加载区域信息. 这时Sprite Atlas就可以当成Spine atlas使用了.
在 .json 或 .skel.bytes skeleton 资产上使用Sprite Atlas的步骤是:
- 将新建的atlas资产和
.json或.skel.bytes放在同一目录下. - 在
Spine SpriteAtlas Import窗口中将atlas资产分配给Skeleton json/skel file属性.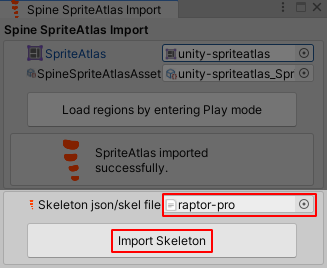
- 点击
Import Skeleton生成使用Sprite Atlas资产的_SkeletonData文件.
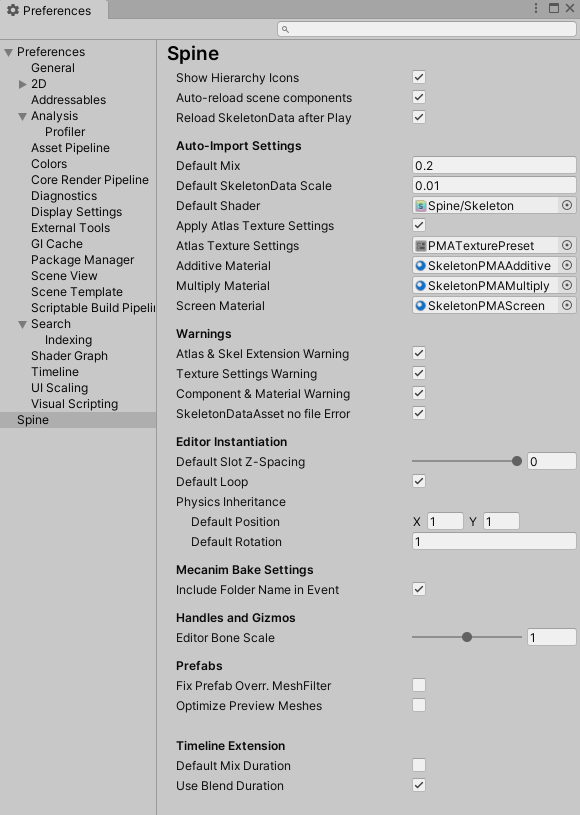
Spine首选项
spine-unity运行时在Unity的 Preferences 窗口中添加了一个 Spine 页面, 通过 Edit - Preferences 即可找到(在Mac上是 Unity - Preferences ). 你可以在里面设置导入和实例化skeleton时使用的默认设置, 还能自定义spine-unity运行时的界面外观和更新行为.
- Show Hierarchy Icons. 启用该选项会在层次结构(hierarchy)面板中, 给附加了Spine组件的
GameObjects显示相关图标. - Auto-reload scene components. 启用该选项会在场景中skeleton组件的SkeletonDataAsset发生变更时, 自动地重新加载这些组件. 当你的场景中有大量的 SkeletonRenderer 或 SkeletonGraphic 组件时, 自动加载操作可能会变得很慢.
- Reload SkeletonData after Play. 当启用该选项时, 运行时将在退出Play模式后(从.json或.skel.bytes文件中)重新加载活动场景中所有Skeleton共享的SkeletonData. 这可能会延长项目的加载时长, 但可以防止在Play模式下修改了的共享SkeletonData影响到下次游玩.
- Auto-Import Settings
- Default Mix. 设置新导入的SkeletonDataAssets的 默认 Mix 时长.
- Default SkeletonData Scale. 该值表示新导入的SkeletonDataAssets的默认
Scale值. - Default Shader. 设置新导入的skeleton atlas textures创建materials时使用的默认着色器.
- Switch Texture Workflow (4.3 及以上版本). 用于在
Straight AlphaorPMA工作流间快速切换预设, 避免手动修改下方的Atlas Texture Settings和Additive/Multiply/Screen Material选项. - Apply Atlas Texture Settings. 将
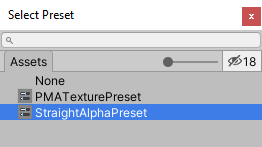
Atlas Texture Settings应用于texture导入器. - Atlas Texture Settings. atlas textures 的自动导入设置. 若使用 straight alpha texture 工作流 (推荐) , 请在此处选择
StraightAlphaTexturePreset(请确保在 Spine Texture Packer 中禁用了Premultiply alpha). 此预设在 spine-unity 4.3 及以上本版中默认启用. 若使用 premultiplied alpha (PMA) textures (Spine 编辑器导出默认值), 请在此处选择PMATexturePreset. 你也可以新建一份自定义的TextureImporterPreset资产并分配于此处. - Apply Additive Material. 新导入的 SkeletonDataAsset 中 Apply Additive Material 的默认值. 详见
SkeletonDataBlend模式Materials. - Additive Material. 设置
Additiveblend 模式槽位的 Material 模板. 详见SkeletonDataBlend 模式 Materials. - Multiply Material. 设置
Multiplyblend 模式槽位的 Material 模板. 详见SkeletonDataBlend 模式 Materials. - Screen Material. 设置
Screenblend 模式槽位的 Material 模板. 详见SkeletonDataBlend 模式 Materials.
- Warnings
- Atlas Extension Warning. 每发现一个
.atlas文件便在日志中输出一条警告和建议. - Texture Settings Warning. 每当检测到texture导入设置会导致错误效果(例如白边伪影)时, 便在日志中输出一条警告和建议.
- Component & Material Warning. 当组件不兼容Material设置时, 在日志中输出一条警告和建议.
- SkeletonDataAsset no file Error. 当从
SkeletonDataAsset中查找SkeletonData时, 若发现没有为其分配json或二进制文件则输出一个错误. - Workflow Mismatch Dialog. 当检测到使用了 PMA atlas 但当前项目设置不支持该工作流时, 显示警告对话框.
- Atlas Extension Warning. 每发现一个
- Editor Instantiation
- Default Slot Z-Spacing. 设置实例化 SkeletonRenderer 或 SkeletonGraphic组件时默认的 Z Spacing 参数.
- Default Loop. 设置实例化 SkeletonRenderer 或 SkeletonGraphic组件时的默认
Loop参数. - Physics Inheritance
- Default Position. 设置实例化 SkeletonRenderer 或 SkeletonGraphic组件时默认的 Physics Inheritance - 位置 缩放因子.
- Default Rotation. 设置实例化 SkeletonRenderer 或 SkeletonGraphic组件时默认的 Physics Inheritance - 旋转 缩放因子.
- Mecanim Bake Settings
- Include Folder Name in Event. 当启用该项时, Mecanim事件将调用以
"FolderNameEventName"方式命名的方法; 反之则调用以"EventName"方式命名的方法.
- Include Folder Name in Event. 当启用该项时, Mecanim事件将调用以
- Handles and Gizmos
- Editor Bone Scale. 设置场景视图中骨骼和gizmo元素的显示尺寸.
- Prefabs
- Fix Prefab Overr. MeshFilter. 该项保存了同名skeleton组件在Unity检查器 Advanced 面板中参数的全局设置. 当组件参数被置为
Use Global Settings时将会使用此处的参数设置. - Optimize Preview Meshes. 启用该项后将在预构建步骤中去除Spine prefab预览网格, 以此降低构建尺寸. 但这将延长构建时间, 因为该操作会优化项目中的全部prefabs.
- Fix Prefab Overr. MeshFilter. 该项保存了同名skeleton组件在Unity检查器 Advanced 面板中参数的全局设置. 当组件参数被置为
- Unsafe Build Defines
- Direct Data Access. 允许不安全的直接数据访问. 当前该设置会影响
.skel.bytes文件的读取, 能够以更少的内存来读取文件.
- Direct Data Access. 允许不安全的直接数据访问. 当前该设置会影响
- Automatic Component Upgrade
- Split Component Upgrade. 自动将旧版 skeleton 组件升级为 4.3 中新增的模块化(Split Component)组件. 一旦项目中所有场景和预制件迁移完成,建议就此关闭该选项以降低 Unity 编辑器开销.
- Upgrade Scenes & Prefabs. Upgrade All: 自动打开并升级项目中所有场景和预制体,使其适配 4.3 版本新增的模块化动画组件. 执行升级前请务必备份项目.
- Threading Defaults
- Threaded Mesh Generation. 用于设置
SkeletonRenderer和SkeletonGraphic组件中同名参数的全局设置. 当组件设置为Use Global Setting时, 将使用此处的全局选项. - Threaded Animation. 于设置
SkeletonAnimation和SkeletonMecanim组件中同名参数的全局设置. 当组件设置为Use Global Setting时, 将使用此处的全局选项.
- Threaded Mesh Generation. 用于设置
- Timeline Extension - 以下选项设置的是 Timeline 扩展 UPM 包 行为
- Default Mix Duration. 设置创建
Spine Animation State Clips时默认的Default Mix Duration参数. - Use Blend Duration. 设置创建
Spine Animation State Clips时默认的Use Blend Duration参数.
- Default Mix Duration. 设置创建
更新Spine资产
在实际开发过程中, 你可能经常需要更新Spine skeleton数据和texture atlas文件. 直接覆盖这些文件其实就能更新这些文件 (.json, .skel.bytes, .atlas.txt, .png). 只需从Spine编辑器中重新导出资产, 并将新导出的文件复制到项目中 Assets 文件夹的子文件夹中覆盖现有文件即可.
Unity会检测这些文件的变化, 并自动重新导入修改后的资产. 自动重新导入会保持对Spine资产引用的完整性同时使用最新数据.
请注意: Unity有时无法识别文件更改. 这时在Unity的项目面板中找到包含你想重导入的Spine资产所在的文件夹, 右击该文件夹然后从菜单中选择
Reimport即可.
Skeleton Data资产
Skeleton data资产 (名字后缀为 _SkeletonData) 存储了skeleton的层次结构、槽位、绘制顺序、动画和其他构成skeleton的数据信息. spine-unity运行的其他组件也将会引用并共享skeleton data资产, 以显示skeleton并播放其动画.
在Unity的项目面板中选中它便可检查或修改这个skeleton data资产. 检查器面板将显示该skeleton数据的所有属性以供查看和修改.
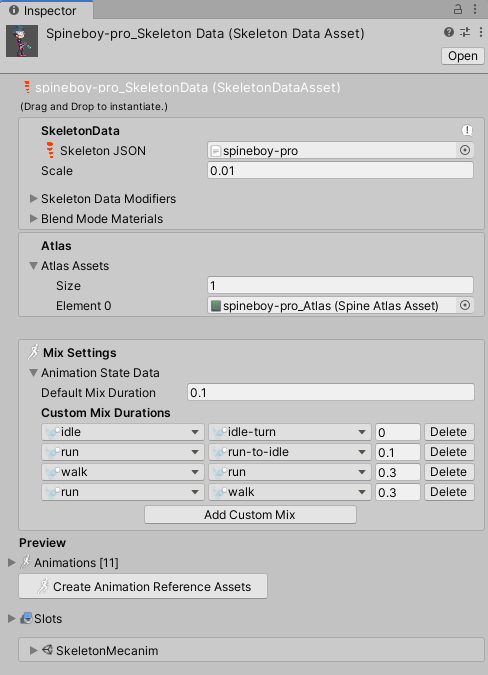
Skeleton Data
SkeletonData设置块包含了skeleton的通用导入设置.
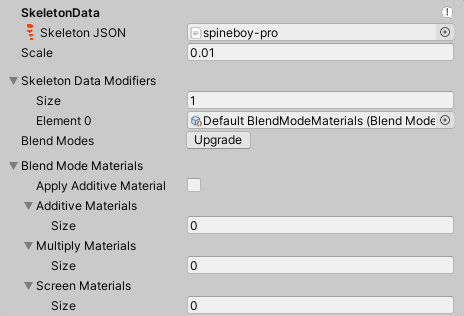
- Scale. 设置自定义导入缩放值, 它会影响所有引用了该数据资产的skeleton实例. 改变该值将立即同步到这个skeleton的所有实例上.
请注意: 当你想实现精确匹配 - 比如将图像中的32px映射为1个游戏单位时 (假设在Spine中没有缩放附件图像), 可以把这个
Scale参数置为1/px_per_unit. 所以对于32px/unit的这个例子来说, 将Scale置为1/32 = 0.03125即可.
-
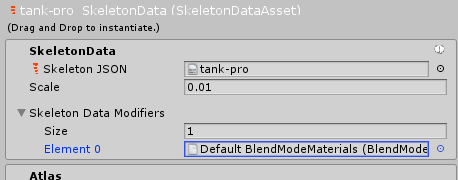
SkeletonData Modifiers. 在对
.json或.skel.bytes文件的加载完成后, 你可以对skeleton data资产进行额外处理. 详情请参考下文中的 SkeletonData 修改器资产 一节. -
Blend Modes - Upgrade. 将过时的
BlendModeMaterialAsset升级为原生的Blend模式Materials属性. -
Blend Mode Materials. 带有特殊blend模式的Skeleton槽位会用到额外的materials. 运行时在导入时会自动设置这些materials, 除非你使用了旧版Unity和旧版spine-unity中的
BlendModeMaterialAsset. 如果你还在使用这种资产, 建议点击上文提到的Blend Modes - Upgrade按钮升级这个BlendModeMaterialAsset, 这样可以防止在新版的Unity中出现问题. 你可以在 Spine 首选项 中自定义每种blend模式的material模板.- Apply Additive Material. 启用该项后, 运行时也会对
Additiveblend模式的槽位生成material. 当在skeleton组件中启用了Advanced - PMA Vertex Colors(默认启用)时, 可禁用该参数. 因为Normal和Additive槽位均可使用PMA material绘制. - Additive Materials, Multiply Materials, Screen Materials. 这些列表显示每个blend模式当前使用的blend模式materials.
- Apply Additive Material. 启用该项后, 运行时也会对
Atlas
skeleton使用Atlas引用来解析图片导出名称, 通过该名称便能定位用以渲染的图像区域.

在导入时, 每个Atlas资产(文件名以 _Atlas 结尾的资产)均会被作为一个元素自动地填入 Atlas Assets 资产数组中.
若spine-unity没有自动填入所需的全部atlas资产, 你可将 Atlas Assets Size 改为对应的atlas资产数量, 并按 Element0 - ElementN 手动将所需的atlas资产填进来.
Mix设置
Skeleton data资产中可以设置 动画mix时长.
Default Mix Duration 设置动画的默认mix时长, 单位为秒.
点击资产的 Custom Mix Durations 中的 Add Custom Mix 按钮可以在某两个动画间新建一个mix, 并设置特定的mix时长, 这样做将会覆盖上文中的默认mix时长值.
使用skeleton data资产的组件(如skeleton动画组件)在播放动画时会用到这些mix时长设置.
预览页面
在Skeleton Data资产的预览页面中可以检查资产中包含的所有骨骼(bone)、槽位、动画、皮肤和事件.
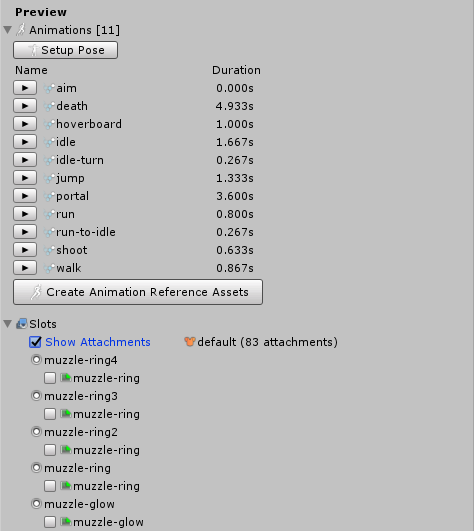
点击每个动画左边的播放按钮可以回放动画, 而在 Slots 中启用 Show Attachments 便能查看对应槽位的实时更新. 所有时间轴事件以紫色标记显示. 在播放预览时将鼠标悬停在标记上, 就能显示事件名称.

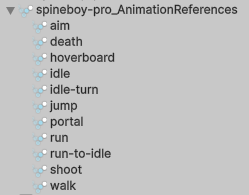
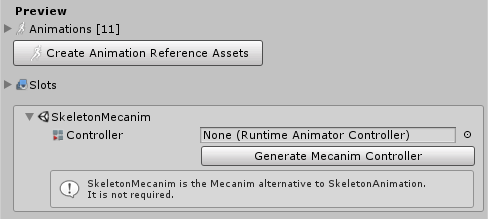
动画引用资产
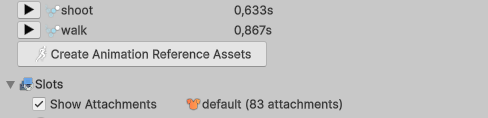
点击 Create Animation Reference Assets 按钮即可为skeleton的所有动画生成引用资产. AnimationReferenceAsset 和一个引用了 Spine.Animation 的Unity资产行为完全一致, 也可以将它用在Unity检查器的组件属性中.
请注意: 在spine-unity 4.3及更高版本中, AnimationReferenceAssets将作为子资产嵌套在一个
_AnimationReferences.asset容器中, 以避免生成数百个资产文件, 从而加快项目搜索速度.
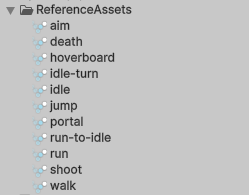
如果你需要像旧版运行时那样在 ReferenceAssets 文件夹中生成独立的
AnimationReferenceAsset文件, 请将SPINE_INDIVIDUAL_ANIMATION_REFERENCE_ASSETS添加到项目的脚本定义符号(Script Define Symbols)中.
Skeleton Mecanim
如果你想使用Unity的Mecanim动画系统而非Spine的默认动画系统, 你可以点击 Generate Mecanim Controller 按钮生成一个Mecanim控制器.
Skeleton烘培
请注意: 烘焙是一个专用工具, 在spine-unity中 不推荐通过这种方式 来使用Skeletons! 它不适用于 SkeletonMecanim, SkeletonAnimation 和 SkeletonGraphic (UI) 组件! 它将把一个Skeleton烘焙成一个不太灵活的, 带有
MeshRenderers且Transforms结构固化的Prefab和一堆动画片段. Spine的大量功能在Unity的动画系统中并不存在, 因此这些功能在烘焙后便会失效.
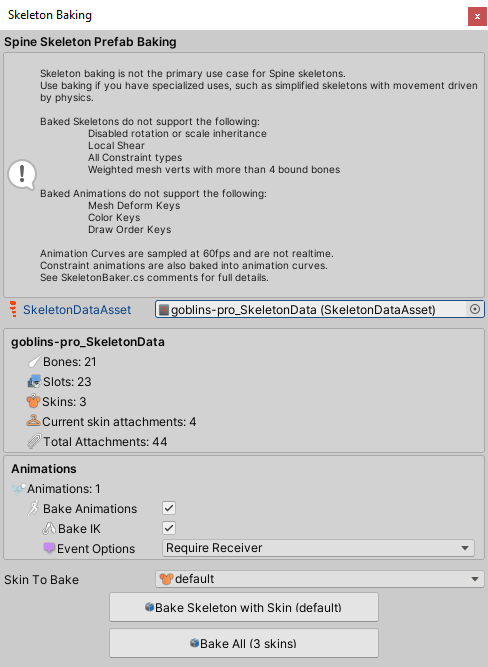
点击 SkeletonDataAsset 检查器右上方的齿轮图标选择 Skeleton Baking 就能打开 Skeleton Baking Window.
在 SkeletonBaker.cs中可以找到功能支持性的详细列表.
请注意: 烘焙没有使用最近新增的Unity 2D动画系统, 而是采用了Unity原生的
MeshRenderer3D动画系统.
Texture Atlas资产
Texture atlas资产包含了skeleton的图像引用数据, 即一张图片存储在texture atlas的哪个页上, 以及它在texture atlas页上的具体UV texture坐标.
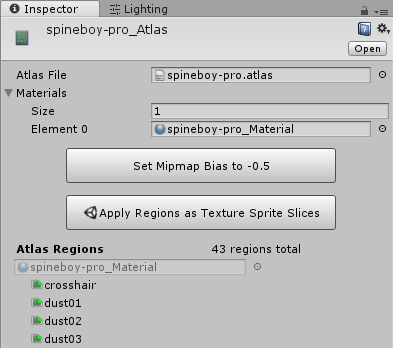
双击 Materials 数组中的material资产来便能查看texture atlas页的material.
请注意: 你可以修改texture atlas资产所引用的material和texture. 但在修改texture时, 务必确保UV texture坐标正确.
SkeletonRenderer组件使用通用的MeshRenderer组件渲染, 所以它也会像附加在cube或quad上一样应用material和texture. 因此你大可按需在Texture Atlas资产上替换或预处理material中的texture.
Set Mipmap Bias to -0.5 按钮是为进阶用户准备的, 对atlas texture启用 Generate Mip Maps 时该选项可以修正Mip-Maps模糊的问题.
点击 Apply Regions as Texture Sprite Slices 按钮会为atlas中每张图像生成sprites. 生成的sprites引用了texture atlas图像( png 文件)区域, 并可作为Unity sprite资产使用.
SkeletonData Modifier资产
在从 .json 或 .skel.bytes 文件加载skeleton后, SkeletonData修改器(Modifier)可以进一步处理skeleton data资产.
SkeletonDataAsset的检查器提供了一个 Skeleton Data Modifiers 列表, 可以在此添加修改器资产.
编写自定义SkeletonDataModifierAsset类
想要在从 .json 或 .skel.bytes 文件加载skeleton数据后进一步地处理skeleton数据, 你可以编写自定义 SkeletonDataModifierAsset 类. SkeletonDataModifierAsset 是一个 ScriptableObject 的抽象类, 你应该从该类中派生你的自定义类.
- 创建一个继承自
SkeletonDataModifierAsset的新类, 并实现void Apply (SkeletonData skeletonData)方法. 如需在Asset -> Create菜单中列出该类, 需要为你的类添加CreateAssetMenu类自定义属性.
public class BlendModeMaterialsAsset : SkeletonDataModifierAsset {
public override void Apply (SkeletonData skeletonData) {
...
}
}
- 在项目面板中选择目标文件夹, 并在
Asset -> Create菜单中点击上文中新创建的菜单项, 便能创建新类的实例资产. 找到 SkeletonData 资产的Skeleton Data Modifiers列表, 将刚创建的修改器资产拖进该列表中即可.
在从 .json 或 .skel.bytes 文件加载完数据后便会调用 Apply(skeletonData).
BlendModeMaterialsAsset Modifier资产 (已废弃)
请注意: spine-unity在
SkeletonDataAsset上支持了 原生的槽位blend模式 (即Additive、Multiply和Screen), 且在导入新skeleton资产时将自动置为SkeletonDataAsset. 现已全面使用原生属性SkeletonDataAsset替代了过时的BlendModeMaterialsAsset, 后者已被废弃. 同时在SkeletonDataAsset检查器面板里新加入了一个Blend Modes - Upgrade按钮, 用以将BlendModeMaterialsAsset升级为原生的Blend模式属性. 该升级操作将在Unity 2020.1及后续版本的资产导入和重导入过程中自动执行, 以避免在这些Unity版本中出现BlendModeMaterialAsset错误. spine-unity 4.0及后续版本亦将自动执行这一升级, 且升级行为无视Unity版本.
BlendModeMaterialsAsset 是spine-unity中内置的一种SkeletonData修改器资产类. 它存储了对materials的引用, 这些materials用于渲染blend模式槽位中的附件, 而blend模式槽位指在 Spine 编辑器中被置为 Additive, Multiply 和 Screen blend模式的槽位.
存储在BlendModeMaterials资产中的Material引用是生成新Materials时的模板, 这些新Materials正好包含了附件中所需的texture.
spine-unity 运行时内置了一个名为 Default BlendModeMaterials 的现成 BlendModeMaterialsAsset. 使用这个内资资产可以使具有特殊blend模式槽位中的附件用上运行时默认的 Multiply 和 Screen 着色器:Spine/Blend Modes/Skeleton PMA Multiply 和 Spine/Blend Modes/Skeleton PMA Screen.
如果需要使用其他类型的Materials/着色器, 或者设置不同的Materials, 可以用 Create -> Spine -> SkeletonData Modifiers -> Blend Mode Materials 菜单创建新的 BlendModeMaterialsAsset. 然后将自定义Material模板分配到这个新建的资产上.