spine-c 运行时文档
Licensing
将官方的Spine运行时整合到你的应用程序之前, 请仔细阅读 Spine运行时许可页面.
开始使用
spine-c是一个通用运行时, 可将Spine动画集成到游戏引擎和使用C、C++、Swift、Rust、Objective-C的原生接口的框架中.
spine-c 提供了如下功能
- 载入 Spine skeletons, 加载导出为JSON或二进制文件的Spine skeletons.
- 载入 texture atlases , texture atlases存储了Spine skeletons所用的图像文件.
- 管理并应用skeleton的 皮肤.
- 管理并应用skeleton的 动画.
- 根据当前的skeleton pose, 槽位&附件状态处理和计算渲染和物理引擎所需的数据.
由于spine-c运行时是一个通用、独立于引擎的运行时, 用户需自行实现一组函数, 以便为spine-c运行时提供特定引擎所需的文件i/o和图像加载功能, 还需要它们通过引擎的渲染系统来渲染spine-c运行时生成的数据. 若有更高级的使用场景(如布娃娃系统), 还可以将运行时生成的数据与引擎的物理系统整合起来.
spine-c运行时基于C99标准编写, 以保证与各种平台和编译器的兼容性.
其他的官方Spine运行时是基于spine-c编写的, 因此亦可作为引擎集成的示例以供研究:
- spine-ios - iOS运行时
- spine-flutter - Flutter运行时
- spine-sfml, SFML运行时
- spine-sdl, SDL运行时
集成spine-c到项目中
CMake集成 (推荐方式)
将 spine-c 集成到你的项目中最简单的方法是通过 CMake FetchContent:
FetchContent_Declare(
spine-c
GIT_REPOSITORY https://github.com/esotericsoftware/spine-runtimes.git
GIT_TAG 4.3
SOURCE_SUBDIR spine-c
)
FetchContent_MakeAvailable(spine-c)
# Link against spine-c
target_link_libraries(your_target spine-c)
这会自动获取并构建 spine-c 及其依赖(spine-cpp).
最后在代码中引入 spine-c 头文件即可:
手动集成
如果需要手工集成:
- 使用 git (
git clone https://github.com/esotericsoftware/spine-runtimes) 或者 zip 压缩包获取 Spine Runtimes 源码 - 将以下源文件加入项目:
spine-cpp/src和spine-c/src目录下的源文件
- 将以下目录引入项目:
spine-cpp/include,spine-c/include
最后在代码中引入 spine-c 头文件:
导出spine-c适用的Spine资产
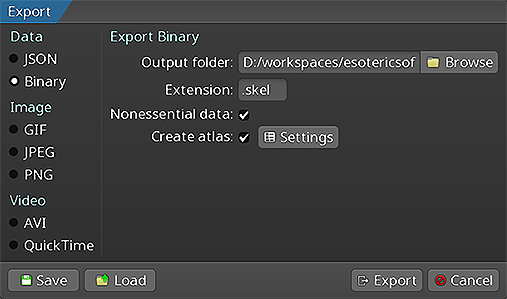 请按照Spine用户指南中的操作步骤, 了解如何:
- 将skeleton & 动画数据 导出为JSON或二进制格式
- 导出包含skeleton图像的texture atlases
导出的skeleton数据和texture atlas将产生以下文件:
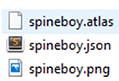
skeleton-name.json或skeleton-name.skel文件, 包含了skeleton和动画数据.skeleton-name.atlas, 包含了texture atlas的相关信息.- 一张或多张
.png文件, 每一个文件表示texture atlas中的一页, 每个页则指打包成页的skeleton所引用的图像.
注意: 也可以不用每个skeleton就生成一个texture atlas的打包方式, 而是将多个skeleton的图像打包成一个texture atlas. 关于此请参考texture 打包指南.
加载Spine资产
spine-c提供了加载texture atlases, Spine skeleton数据(骨骼、槽位、附件、皮肤、动画)和通过动画状态数据定义动画间mix时间的API. 这三种类型的数据, 也被称为setup pose数据, 通常加载一次后就能被每个游戏对象(game object)共享. 共享机制是通过赋予每个游戏对象其不同的Skelton和动画状态来实现的, 亦可称其为实例数据.
注意: 关于全局加载架构的更详细描述, 请参考更通用的 Spine 运行时文档.
加载texture atlases
Texture atlas数据以自有的 atlas格式 存储, 它描述了atlas页中各图像的位置. atlas页本身以普通的.png文件的形式存在atlas文件旁边.
spine-c 有两种加载 atlases 的方法:
方法 1: 无textures的atlas加载
使用 spine_atlas_load 解析 atlas 数据但不加载texture. 因此需要为手动加载每个 atlas 页的 texture:
char* atlasData = read_file_to_string("path/to/skeleton.atlas");
// Parse the atlas data (doesn't load textures)
spine_atlas_result result = spine_atlas_load(atlasData);
// Check for errors
if (spine_atlas_result_get_error(result)) {
printf("Error loading atlas: %s\n", spine_atlas_result_get_error(result));
spine_atlas_result_dispose(result);
exit(1);
}
spine_atlas atlas = spine_atlas_result_get_atlas(result);
spine_atlas_result_dispose(result);
// Manual texture loading: spine_atlas_load sets page indices, not texture pointers
// You need to load textures and set them on the regions for each page
spine_array_atlas_page pages = spine_atlas_get_pages(atlas);
int num_pages = spine_array_atlas_page_size(pages);
// Load texture for each page
void** page_textures = malloc(num_pages * sizeof(void*));
spine_atlas_page* pages_buffer = spine_array_atlas_page_buffer(pages);
for (int i = 0; i < num_pages; i++) {
spine_atlas_page page = pages_buffer[i];
// Get the texture filename from the atlas
const char* texture_name = spine_atlas_page_get_texture_path(page);
// Construct full path (you need to know where your textures are)
char full_path[256];
snprintf(full_path, sizeof(full_path), "%s/%s", atlas_dir, texture_name);
// Load texture using your engine
page_textures[i] = engine_load_texture(full_path);
}
// Set renderer objects on all regions to point to their page's texture
spine_array_atlas_region regions = spine_atlas_get_regions(atlas);
int num_regions = spine_array_atlas_region_size(regions);
spine_atlas_region* regions_buffer = spine_array_atlas_region_buffer(regions);
for (int i = 0; i < num_regions; i++) {
spine_atlas_region region = regions_buffer[i];
spine_atlas_page page = spine_atlas_region_get_page(region);
// spine_atlas_load stores the page index in the page's texture field
int page_index = (int)(intptr_t)spine_atlas_page_get_texture(page);
// Set the actual texture as the region's renderer object
spine_atlas_region_set_renderer_object(region, page_textures[page_index]);
}
free(page_textures);
方法 2: 使用texture加载回调函数
使用 spine_atlas_load_callback 在解析 atlas 的时候自动加载 textures:
void* my_load_texture(const char* path) {
// path is the full path: atlas_dir + "/" + texture_name
// e.g., "path/to/atlas/dir/skeleton.png"
return engine_load_texture(path);
}
void my_unload_texture(void* texture) {
engine_unload_texture(texture);
}
// First, load the .atlas file contents into a string
char* atlasData = read_file_to_string("path/to/skeleton.atlas");
// Load atlas with automatic texture loading
spine_atlas_result result = spine_atlas_load_callback(
atlasData, // Atlas file contents as string
"path/to/atlas/dir", // Directory where texture files are located
my_load_texture, // Your texture load function
my_unload_texture // Your texture unload function
);
// Check for errors
if (spine_atlas_result_get_error(result)) {
printf("Error loading atlas: %s\n", spine_atlas_result_get_error(result));
spine_atlas_result_dispose(result);
exit(1);
}
spine_atlas atlas = spine_atlas_result_get_atlas(result);
spine_atlas_result_dispose(result);
加载skeleton数据
Skeleton数据(骨骼、槽、约束、附件、皮肤、动画)可导出为人类可读的JSON文件或自有的二进制格式. spine-c在spine_skeleton_data结构体中存储Skelton数据.
为加载从JSON导出的Skelton数据:
char* jsonString = read_file_to_string("path/to/skeleton.json");
// Load skeleton data from JSON
spine_skeleton_data_result json_result = spine_skeleton_data_load_json(
atlas, // Previously loaded atlas
jsonString, // JSON file contents as string
"skeleton.json" // Path for error reporting
);
// Check for errors
if (spine_skeleton_data_result_get_error(json_result)) {
printf("Error loading skeleton: %s\n", spine_skeleton_data_result_get_error(json_result));
spine_skeleton_data_result_dispose(json_result);
exit(1);
}
// Get the skeleton data from the result
spine_skeleton_data skeleton_data = spine_skeleton_data_result_get_data(json_result);
// Dispose the result (but keep the skeleton data)
spine_skeleton_data_result_dispose(json_result);
加载二进制格式的skeleton数据:
uint8_t* binaryData = read_file_to_bytes("path/to/skeleton.skel", &dataLength);
// Load skeleton data from binary
spine_skeleton_data_result binary_result = spine_skeleton_data_load_binary(
atlas, // Previously loaded atlas
binaryData, // Binary data as uint8_t array
dataLength, // Length of binary data
"skeleton.skel" // Path for error reporting
);
// Check for errors and get skeleton data (same as JSON)
if (spine_skeleton_data_result_get_error(binary_result)) {
printf("Error loading skeleton: %s\n", spine_skeleton_data_result_get_error(binary_result));
spine_skeleton_data_result_dispose(binary_result);
exit(1);
}
spine_skeleton_data skeleton_data = spine_skeleton_data_result_get_data(binary_result);
spine_skeleton_data_result_dispose(binary_result);
注意: 生产环境中更推荐使用二进制格式, 因为它比 JSON 更小、加载更快.
准备动画状态数据
当从一个动画切换到另一个动画时, Spine可进行平滑过渡(淡入淡出). 淡入淡出(crossfades)是通过在指定mix时间内将一个动画与另一个动画混合(mix)来实现的. spine-c运行时提供了结构体 spine_animation_state_data 来定义这些mix时间:
spine_animation_state_data anim_state_data = spine_animation_state_data_create(skeleton_data);
// Set the default mix time between any pair of animations in seconds
spine_animation_state_data_set_default_mix(anim_state_data, 0.1f);
// Set the mix time between specific animations, overwriting the default
spine_animation_state_data_set_mix_1(anim_state_data, "jump", "walk", 0.2f);
spine_animation_state_data 中定义的mix时间也可以在应用动画时被显式覆盖(见下文).
Skeletons
Setup pose数据 (skeleton数据和texture atlases等) 应在游戏对象间共享. 每个游戏对象都持有自己的 spine_skeleton 实例, 该实例引用了 spine_skeleton_data 和 spine_atlas 实例作为其数据源.
可以自由修改 Skeletons (例如程序化骨骼操作、动画、附件、皮肤),同时保持底层数据保持完整. 因此可以在任意数量的游戏对象间高效地共享 Skeletons.
创建skeletons
每个游戏对象都需要其私有的 skeleton 实例. 大部分数据储存在spSkeletonData和spAtlas中, 并由所有spSkeleton实例共享, 以最大程度减少内存消耗和texture切换开销. 因此一个spSkeleton的生命周期与其对应的游戏对象的生命周期几近同步.
注意: 当不再需要 Skeletons 后应使用
spine_skeleton_dispose(skeleton)来显式销毁它.
骨骼
Skeleton包含了骨骼的层次结构, 槽位附着于骨骼, 而附件附加于槽位.
查找骨骼
Skeleton中的所有骨骼均以其唯一名称命名, 可通过该名称从skeleton中获取骨骼:
spine_bone bone = spine_skeleton_find_bone(skeleton, "mybone");
本地变换
一根骨骼受其父骨骼的影响, 该限制可一直追溯自根骨骼. 骨骼继承变换的方式由其 变换继承 设置控制. 每根骨骼都存储了相对于其父骨骼的本地变换, 包括:
- 相对于父骨骼的
x和y位置. rotation角度.scaleX和scaleY.shearX和shearY角度.
改变骨骼的姿态 (spine_bone_local) 便能实现本地变换:
spine_bone_local pose = spine_bone_get_pose(bone);
// Get local transform properties
float x = spine_bone_local_get_x(pose);
float y = spine_bone_local_get_y(pose);
float rotation = spine_bone_local_get_rotation(pose);
float scaleX = spine_bone_local_get_scale_x(pose);
float scaleY = spine_bone_local_get_scale_y(pose);
float shearX = spine_bone_local_get_shear_x(pose);
float shearY = spine_bone_local_get_shear_y(pose);
// Modify local transform
spine_bone_local_set_position(pose, 100, 50);
spine_bone_local_set_rotation(pose, 45);
spine_bone_local_set_scale_1(pose, 2, 2);
骨骼的本地变换可随程序代码或应用动画而改变. 两者都可以同时进行, 结果将被合并存储在一个姿态(pose)中.
世界变换
一旦设置了所有的本地变换, 无论是通过程序还是通过应用动画来修改骨骼的本地变换, 最终都需要每块骨骼的世界变换来进行渲染和物理计算.
计算从根骨骼开始, 然后递归地计算所有子骨骼的世界变换. 该计算同时计入了 IK、变换(transform)、路径(path)和 slider 约束.
计算世界变换:
spine_skeleton_update_world_transform(skeleton, SPINE_PHYSICS_UPDATE);
deltaTime 指定当前帧和上一帧间经过的时间, 单位为秒. 第二个参数指定物理行为, SPINE_PHYSICS_UPDATE 已经是一个很好的默认值.
世界变换可通过骨骼已应用 pose (BonePose) 访问:
// Get world transform matrix components
float a = spine_bone_pose_get_a(applied); // 2x2 matrix encoding
float b = spine_bone_pose_get_b(applied); // rotation, scale
float c = spine_bone_pose_get_c(applied); // and shear
float d = spine_bone_pose_get_d(applied);
// Get world position
float worldX = spine_bone_pose_get_world_x(applied);
float worldY = spine_bone_pose_get_world_y(applied);
要注意 worldX 和 worldY 会受 skeleton 的 x 和 y 位置影响.
也绝不应直接修改世界变换. 它们总是通过调用 spine_skeleton_update_world_transform 从本地变换中推导出来的.
坐标系转换
spine-c运行时提供坐标系间转换的函数. 所有这些函数都假定骨骼的世界变换已经得出:
spine_bone_pose applied = spine_bone_get_applied_pose(bone);
// Get world rotation and scale
float rotationX = spine_bone_pose_get_world_rotation_x(applied);
float rotationY = spine_bone_pose_get_world_rotation_y(applied);
float scaleX = spine_bone_pose_get_world_scale_x(applied);
float scaleY = spine_bone_pose_get_world_scale_y(applied);
// Transform between world and local space
float localX, localY, worldX, worldY;
spine_bone_pose_world_to_local(applied, worldX, worldY, &localX, &localY);
spine_bone_pose_local_to_world(applied, localX, localY, &worldX, &worldY);
// Transform rotations
float localRotation = spine_bone_pose_world_to_local_rotation(applied, worldRotation);
float worldRotation = spine_bone_pose_local_to_world_rotation(applied, localRotation);
注意: 在调用
spine_skeleton_update_world_transform后, 对骨骼(及其所有子骨骼)的本地变换修改才会反映在骨骼的世界变换上.
定位(Positioning)
默认情况下, 一个 skeleton 默认位于游戏中世界坐标系的原点. 如需在游戏的世界坐标系中定位 skeleton:
spine_skeleton_set_x(skeleton, myGameObject->worldX);
spine_skeleton_set_y(skeleton, myGameObject->worldY);
// Or set both at once
spine_skeleton_set_position(skeleton, myGameObject->worldX, myGameObject->worldY);
注意: 在调用
spine_skeleton_update_world_transform后, 对 skeleton 的x和y属性的修改才会反映在 skeleton 的世界变换上.
翻转
skeleton 可以进行垂直或水平翻转:
spine_skeleton_set_scale(skeleton, 1, -1); // Flip vertically
// Or individually: spine_skeleton_set_scale_x(skeleton, -1); spine_skeleton_set_scale_y(skeleton, -1);
对于 y 轴向下的坐标系(Spine 默认 y 轴朝上), 可以调整全局设置:
注意: 在调用
spine_skeleton_update_world_transform后, 缩放 skeleton 操作才会反映在 skeleton 的世界变换上.
设置皮肤
创建 skeleton 的美术同事可能为 skeleton 添加了多个皮肤, 以丰富同一个 skeleton 的视觉变化, 例如一个不同角色或不同装备的 skeleton. 运行时中的皮肤 本质是一个映射, 它定义了哪个 附件 进入 skeleton 的哪个 槽位.
每个 skeleton 至少在 setup pose 有一套皮肤. 额外皮肤也有独自的名称来互相区分.
用spine-c在一个skeleton上设置一个皮肤可以这么写:
spine_skeleton_set_skin_1(skeleton, "my_skin_name");
// Set the default setup pose skin
spine_skeleton_set_skin_2(skeleton, NULL);
创建自定义皮肤
你可以在运行时通过组合现有皮肤来创建自定义皮肤(皮肤混搭):
spine_skin custom_skin = spine_skin_create("custom-character");
// Add multiple skins to create a mix-and-match combination
spine_skin_add_skin(custom_skin, spine_skeleton_data_find_skin(skeleton_data, "skin-base"));
spine_skin_add_skin(custom_skin, spine_skeleton_data_find_skin(skeleton_data, "armor/heavy"));
spine_skin_add_skin(custom_skin, spine_skeleton_data_find_skin(skeleton_data, "weapon/sword"));
spine_skin_add_skin(custom_skin, spine_skeleton_data_find_skin(skeleton_data, "hair/long"));
// Apply the custom skin to the skeleton
spine_skeleton_set_skin_2(skeleton, custom_skin);
注意: 当不再使用某套自定义皮肤后, 应通过
spine_skin_dispose(custom_skin)将其手动销毁.
注意: 设置皮肤会影响到之前已经设置的皮肤和附件. 请参考通用运行时指南以了解更多关于如何更改皮肤的信息.
设置附件
spine-c 允许在 skeleton 的槽位上直接设置一个附件, 比如可以用来切换武器:
spine_skeleton_set_attachment(skeleton, "hand", "sword");
// Clear the attachment on the "hand" slot
spine_skeleton_set_attachment(skeleton, "hand", NULL);
附件的搜索顺序是先查找当前皮肤, 再搜索默认皮肤.
着色(Tinting)
你可以通过设置skeleton的颜色来给该skeleton中的所有附件着色:
spine_skeleton_set_color_2(skeleton, 1.0f, 0.0f, 0.0f, 0.5f);
// Or using a color struct
spine_color color = spine_skeleton_get_color(skeleton);
// Modify color...
spine_skeleton_set_color_1(skeleton, color);
注意: spine-c中的颜色是以RGBA的形式给出的, 各通道的取值范围为[0-1].
每个槽位也有自己的颜色属性可供运行时操作:
spine_slot_pose pose = spine_slot_get_pose(slot);
spine_color slot_color = spine_slot_pose_get_color(pose);
// The slot color is multiplied with the skeleton color when rendering
请注意动画也会改变槽位的颜色. 若你手动更改了一个槽位的颜色, 然后应用了一个key了该槽位颜色的动画, 那么你手动设置的颜色将被覆盖.
应用动画
美术同事可通过Spine编辑器创建多个命名唯一的 动画. 一个动画就是一组 时间轴. 每条时间轴指定了在哪一帧, 骨骼或skeleton的哪个属性应该变为何值, 例如改变骨骼变换, 附件可见性或者槽位颜色等等.
时间轴 API
如果需要直接处理时间轴, spine-c提供了一个 时间轴API. 这个底层功能让你可以自由定制美术同事捣鼓出的动画以何种方式应用于skeleton.
动画状态 API
在大部分情况下, 都建议使用 动画状态API 而非时间轴API. 与底层的时间轴API相比, 动画状态API可以:
- 在某段时间内应用动画
- 队列动画
- mix动画(淡入淡出)
- 同时应用多个动画(分层动画)
动画状态API内部使用的也是时间轴API, 因此可以将其看作是时间轴API的封装器.
spine-c 用 spine_animation_state 表示动画状态. 每个游戏对象有其自己的 skeleton 状态实例和动画状态实例. 它们与全部其他实例共享着底层的 spine_skeleton_data 和 spine_animation_state_data 来减少内存开销.
创建动画状态
该函数接收一个通常在加载skeleton数据时创建的 spine_animation_state_data 实例, 它定义了默认的mix时间以及特定动画间淡入淡出的mix时间.
注意: 当不再使用该动画状态后, 应通过
spine_animation_state_dispose(animation_state)将其手动销毁.
轨道&队列
一个动画状态实例管理着一条或多条 轨道. 每条轨道本质是一个动画的列表, 这些动画按它们被添加到轨道中的顺序来进行回放. 这一行为被称为队列. 轨道的索引始于0.
你可以像这样在一条轨道上队列一个动画:
int track = 0;
bool loop = true;
float delay = 0;
spine_animation_state_add_animation_1(animation_state, track, "walk", loop, delay);
一次队列多个动画来实现动画序列:
spine_animation_state_add_animation_1(animation_state, 0, "walk", true, 0);
// Jump after 3 seconds
spine_animation_state_add_animation_1(animation_state, 0, "jump", false, 3);
// Idle indefinitely after jumping
spine_animation_state_add_animation_1(animation_state, 0, "idle", true, 0);
也可以清空一条轨道中队列着的所有动画:
spine_animation_state_clear_track(animation_state, 0);
// Clear all tracks
spine_animation_state_clear_tracks(animation_state);
清空轨道并添加新动画到轨道上, 同时保持对上一个动画的过渡:
spine_animation_state_set_animation_1(animation_state, 0, "shot", false);
// Queue "idle" to play after "shot"
spine_animation_state_add_animation_1(animation_state, 0, "idle", true, 0);
要从一个动画过渡切换到skeleton的setup pose:
spine_animation_state_set_empty_animation(animation_state, 0, 0.5f);
// Or queue a crossfade to setup pose as part of a sequence
spine_animation_state_add_empty_animation(animation_state, 0, 0.5f, 0);
更复杂的游戏可能希望在不同的轨道上队列动画:
spine_animation_state_set_animation_1(animation_state, 0, "walk", true);
// Simultaneously shoot on track 1
spine_animation_state_set_animation_1(animation_state, 1, "shoot", false);
注意: 若如上文所写的方式同时应用多个动画, 高轨道上的动画将覆盖低轨道上的动画, 因为这两个动画都key进了每个值. 务必确保两个要同时播放的动画不会在skeleton中key进相同的值.
轨道条目
当在动画状态的某条轨道上入队一个动画, 相应函数将返回一个轨道条目(Track Entries):
用轨道条目就可以自定义动画回放实例:
spine_track_entry_set_mix_duration(entry, 0.5f);
轨道条目在它所代表的动画播放完成前都是有效的. 只要动画还在播放就可存储并复用轨道条目.也能调用 spine_animation_state_get_current 获取当前正在播放的动画的轨道条目:
事件
一个动画状态实例在播放队列动画时将产生事件, 以通知监听器如下状态更改:
- 动画播放 开始(started).
- 动画播放 中断(interrupted), 例如清空了一条轨道.
- 动画播放 完成(completed), 如果循环播放动画则该事件会多次触发.
- 动画播放 结束(ended), 既可能缘于动画播放中断亦可能是非循环动画播放完成.
- 动画及其对应
TrackEntry已被 释放(disposed) 且不再可用. - 触发了 用户自定义的 事件(event).
你可以注册一个函数来监听这些事件, 该函数可以注册到某个动画状态上,也可以注册到某个轨道条目上.
void my_listener(spine_animation_state state, spine_event_type type,
spine_track_entry entry, spine_event event, void* user_data) {
// Cast user_data to your context if needed
MyGameContext* context = (MyGameContext*)user_data;
switch (type) {
case SPINE_EVENT_TYPE_START:
printf("Animation started\n");
break;
case SPINE_EVENT_TYPE_INTERRUPT:
printf("Animation interrupted\n");
break;
case SPINE_EVENT_TYPE_END:
printf("Animation ended\n");
break;
case SPINE_EVENT_TYPE_COMPLETE:
printf("Animation completed (loops fire this each loop)\n");
break;
case SPINE_EVENT_TYPE_DISPOSE:
printf("Track entry disposed\n");
break;
case SPINE_EVENT_TYPE_EVENT:
// User-defined event from animation
if (event) {
spine_event_data data = spine_event_get_data(event);
const char* name = spine_event_data_get_name(data);
printf("Event: %s\n", name);
// Access event data
int int_value = spine_event_data_get_int_value(data);
float float_value = spine_event_data_get_float_value(data);
const char* string_value = spine_event_data_get_string_value(data);
}
break;
}
}
// Register listener for all tracks
MyGameContext* context = get_my_game_context();
spine_animation_state_set_listener(animation_state, my_listener, context);
// Or register listener for a specific track entry
spine_track_entry entry = spine_animation_state_set_animation_1(animation_state, 0, "walk", true);
spine_track_entry_set_listener(entry, my_listener, context);
// Clear listeners by setting to NULL
spine_animation_state_set_listener(animation_state, NULL, NULL);
spine_track_entry_set_listener(entry, NULL, NULL);
轨道条目在它所代表的动画播放完成前均为有效状态. 在该条目被销毁前, 注册了的监听器都会因事件而被调用.
应用动画状态
动画状态本身是基于时间的. 你需要将动画状态按帧差时间推进, 然后应用到 skeleton 上:
void update(float deltaTime) {
// Advance the animation state by deltaTime seconds
spine_animation_state_update(animation_state, deltaTime);
// Apply the animation state to the skeleton's local transforms
spine_animation_state_apply(animation_state, skeleton);
// Calculate world transforms for rendering
spine_skeleton_update(skeleton, deltaTime);
spine_skeleton_update_world_transform(skeleton, SPINE_PHYSICS_UPDATE);
}
spine_animation_state_update 会按帧差时间推进所有轨道, 并同时触发可能的事件.
spine_animation_state_apply 根据全部轨道的当前状态修改skeleton的本地变换. 包括:
- 应用每个动画
- 在各动画间过渡
- 在多条轨道上分层动画
应用了动画后, 应调用 spine_skeleton_update_world_transform 来更新世界变换, 为渲染或物理运动做好准备.
Skeleton drawable
为了简化管理, spine-c 提供了将skeleton、动画状态和动画状态数据合并起来的单一对象: spine_skeleton_drawable:
spine_skeleton_drawable drawable = spine_skeleton_drawable_create(skeleton_data);
// Access the skeleton and animation state
spine_skeleton skeleton = spine_skeleton_drawable_get_skeleton(drawable);
spine_animation_state animation_state = spine_skeleton_drawable_get_animation_state(drawable);
spine_animation_state_data animation_state_data = spine_skeleton_drawable_get_animation_state_data(drawable);
// Update and render in one call
spine_skeleton_drawable_update(drawable, deltaTime);
spine_render_command render_command = spine_skeleton_drawable_render(drawable);
// Get animation state events
spine_animation_state_events events = spine_skeleton_drawable_get_animation_state_events(drawable);
int num_events = spine_animation_state_events_get_num_events(events);
for (int i = 0; i < num_events; i++) {
spine_event_type type = spine_animation_state_events_get_event_type(events, i);
spine_track_entry entry = spine_animation_state_events_get_track_entry(events, i);
if (type == SPINE_EVENT_TYPE_EVENT) {
spine_event event = spine_animation_state_events_get_event(events, i);
// Handle event
}
}
spine_animation_state_events_reset(events);
// Dispose when done (disposes skeleton and animation state, but not skeleton data)
spine_skeleton_drawable_dispose(drawable);
可绘制对象(drawable)合并了更新和应用操作, 从而简化了更新周期. 不过要完全控制动画流程, 还是建议直接使用 skeleton 和动画状态 API.
渲染
spine-c 提供了一个与渲染器无关的接口来绘制 skeleton. 渲染过程会生成 spine_render_command 对象, 每个对象代表一批带有 blend 模式和 texture 信息的 texture 三角形网格, 方便提交给任意图形 API 进行渲染.
渲染命令
在更新 skeleton 的世界变换后便可生成渲染命令:
spine_render_command command = spine_skeleton_drawable_render(drawable);
// Or using skeleton renderer directly (reusable for multiple skeletons, not thread-safe)
spine_skeleton_renderer renderer = spine_skeleton_renderer_create();
spine_render_command command = spine_skeleton_renderer_render(renderer, skeleton);
渲染器会自动处理以下事项:
- 将连续的区域(region)和网格(mesh)附件中 texture 和 blend 模式一致的三角形合批
- 为剪裁(clipping)附件应用剪裁
- 生成优化后的绘制调用(draw calls)
每个渲染命令包含以下内容:
- 顶点数据(位置、UV 坐标、颜色)
- 三角形索引数据
- 采样来的 texture
- Blend 模式(normal、additive、multiply、screen)
处理渲染命令
将所有渲染命令逐一提交给图形 API:
void render_skeleton(spine_render_command first_command) {
spine_render_command command = first_command;
while (command) {
// Get command data
float* positions = spine_render_command_get_positions(command);
float* uvs = spine_render_command_get_uvs(command);
uint32_t* colors = spine_render_command_get_colors(command);
uint16_t* indices = spine_render_command_get_indices(command);
int num_vertices = spine_render_command_get_num_vertices(command);
int num_indices = spine_render_command_get_num_indices(command);
// Get texture and blend mode
void* texture = spine_render_command_get_texture(command);
spine_blend_mode blend_mode = spine_render_command_get_blend_mode(command);
// Set graphics state
graphics_bind_texture(texture);
graphics_set_blend_mode(blend_mode);
// Submit vertices and indices to GPU
graphics_set_vertices(positions, uvs, colors, num_vertices);
graphics_draw_indexed(indices, num_indices);
// Move to next command
command = spine_render_command_get_next(command);
}
}
Blend模式
根据 Blend 模式配置图形 API 的 blend 函数:
switch (mode) {
case SPINE_BLEND_MODE_NORMAL:
// Premultiplied: src=GL_ONE, dst=GL_ONE_MINUS_SRC_ALPHA
// Straight: src=GL_SRC_ALPHA, dst=GL_ONE_MINUS_SRC_ALPHA
break;
case SPINE_BLEND_MODE_ADDITIVE:
// Premultiplied: src=GL_ONE, dst=GL_ONE
// Straight: src=GL_SRC_ALPHA, dst=GL_ONE
break;
case SPINE_BLEND_MODE_MULTIPLY:
// Both: src=GL_DST_COLOR, dst=GL_ONE_MINUS_SRC_ALPHA
break;
case SPINE_BLEND_MODE_SCREEN:
// Both: src=GL_ONE, dst=GL_ONE_MINUS_SRC_COLOR
break;
}
}
实现示例
完整的渲染实现, 可见于:
- spine-sfml: 基于SFML的渲染器
- spine-sdl: 基于SDL的渲染器
- spine-glfw: 带有GLFW的OpenGL渲染器
这些示例项目展示了如何将 spine-c 渲染功能集成到不同的图形API和框架中.
内存管理
spine-c 的内存管理是简单明了的. 任何通过 spine_*_create 分配内存的对象都需要通过相应 spine_*_dispose 函数来销毁. 加载器返回的对象所使用的结果类型, 则需要通过相应 spine_*_result_dispose 函数来销毁.
对象的生命周期管理应遵循如下原则:
- 在游戏或关卡启动时创建由实例数据(
spine_atlas,spine_skeleton_data,spine_animation_state_data)共享的 setup pose 数据, 应在游戏或关卡结束时销毁. - 在创建相应的游戏对象时创建实例数据 (
spine_skeleton,spine_animation_state), 在销毁游戏对象时销毁它. - 使用
spine_skeleton_drawable简化内存管理: 它合并了 skeleton、动画状态和动画状态数据.
轨道条目(spine_track_entry)从入队一段动画(spine_animation_state_set_animation_*, spine_animation_state_add_animation_*)到 SPINE_EVENT_TYPE_DISPOSE 事件被发送到监听器的这段时间里一直有效. 在此事件触发后再访问轨道条目, 则会导致不可预料的程序行为.
在创建对象时经常传入其他对象作为引用. 而创建的这些对象绝不会自动销毁被它们引用的对象:
- 销毁
spine_skeleton不会释放spine_skeleton_data和spine_atlas. 该设计有其缘由, 盖因 skeleton 数据可能正被其他 skeleton 实例所共享. - 销毁
spine_skeleton_data也不会释放spine_atlas. 这该设计亦有其缘由, 因为 atlas 可能正被其他 skeleton 数据实例所共享. - 然而销毁
spine_skeleton_drawable则会同时销毁其 skeleton 和动画状态, 但不销毁 skeleton 数据.
类型信息与类型转换
spine-c 使用不透明指针(opaque pointers)来表示 C++ 对象. 某些类型之间存在继承关系, 在基类与派生类之间转换时需要显式进行类型转换.
RTTI
spine-c 中所有多态类型都提供了RTTI(运行时类型信息), 用于在运行时识别其具体类型:
spine_constraint* buffer = spine_array_constraint_buffer(constraints);
for (int i = 0; i < spine_array_constraint_size(constraints); i++) {
spine_constraint constraint = buffer[i];
spine_rtti rtti = spine_constraint_get_rtti(constraint);
// Check the exact type
if (spine_rtti_is_exactly(rtti, spine_transform_constraint_rtti())) {
// This is exactly a TransformConstraint
}
// Check if it's an instance of a type (includes derived types)
if (spine_rtti_is_instance_of(rtti, spine_constraint_rtti())) {
// This is a Constraint or derived from Constraint
}
// Get the class name for debugging
const char* class_name = spine_rtti_get_class_name(rtti);
printf("Constraint type: %s\n", class_name);
}
类型转换
由于 C++ 支持多继承, 不同类型的指针在转换时其地址值可能会发生变化. spine-c 提供了专门的转换函数, 以正确处理这些指针调整.
向上转换(派生类到基类)
向上转换始终是安全的, 通常用于将派生类型存入基类容器中:
// Cast to base type for storage in array
spine_constraint base = spine_transform_constraint_cast_to_constraint(tc);
spine_array_constraint_add(constraints_array, base);
向下转换(基类到派生类)
向下转换前必须确认对象的实际类型. 应先使用 RTTI 验证后再执行转换:
// Check type before downcasting
spine_rtti rtti = spine_constraint_get_rtti(constraint);
if (spine_rtti_is_exactly(rtti, spine_transform_constraint_rtti())) {
// Safe to downcast
spine_transform_constraint tc = spine_constraint_cast_to_transform_constraint(constraint);
spine_transform_constraint_data data = spine_transform_constraint_get_data(tc);
// Use the transform constraint...
}
常见的类型继承关系
以下是需要进行类型转换的主要继承关系:
- Constraints:
IkConstraint,PathConstraint,PhysicsConstraint,TransformConstraint→Constraint - Constraint data:
IkConstraintData,PathConstraintData等. →ConstraintData - Attachments:
RegionAttachment,MeshAttachment,BoundingBoxAttachment等 →Attachment - Timelines: 多种时间轴类型 →
CurveTimeline→Timeline
附件类型转换示例:
spine_attachment attachment = spine_slot_get_attachment(slot);
if (attachment) {
spine_rtti rtti = spine_attachment_get_rtti(attachment);
if (spine_rtti_is_exactly(rtti, spine_region_attachment_rtti())) {
spine_region_attachment region = spine_attachment_cast_to_region_attachment(attachment);
// Work with region attachment...
} else if (spine_rtti_is_exactly(rtti, spine_mesh_attachment_rtti())) {
spine_mesh_attachment mesh = spine_attachment_cast_to_mesh_attachment(attachment);
// Work with mesh attachment...
}
}
注意: 切勿对 spine-c 的类型使用 C 风格强制转换(如
(spine_transform_constraint)constraint). 务必使用提专用转换函数以确保指针地址正确.