spine-cpp 运行时文档
Licensing
将官方的Spine运行时整合到你的应用程序之前, 请仔细阅读 Spine运行时许可页面.
开始使用
spine-cpp是一个通用运行时, 可将Spine动画集成到游戏引擎和使用C++的原生接口的框架中.
spine-cpp 提供了如下功能:
- 载入 Spine skeletons, 加载导出为JSON或二进制文件的Spine skeletons.
- 载入 texture atlases, texture atlases存储了Spine skeletons所用的图像文件.
- 管理并应用skeleton的 皮肤.
- 管理并应用skeleton的 动画.
- 根据当前的skeleton pose, 槽位&附件状态处理和计算渲染和物理引擎所需的数据.
由于spine-cpp运行时是一个通用、独立于引擎的运行时, 用户需自行实现一组函数, 以便为spine-cpp运行时提供特定引擎所需的文件i/o和图像加载功能, 还需要它们通过引擎的渲染系统来渲染spine-cpp运行时生成的数据. 若有更高级的使用场景(如布娃娃系统), 还可以将运行时生成的数据与引擎的物理系统整合起来.
spine-cpp运行时基于C++11标准编写, 以保证与各种平台和编译器的兼容性.
其他的官方Spine运行时是基于spine-cpp编写的, 因此亦可作为引擎集成的示例以供研究:
-
spine-cocos2dx, Cocos2D-x运行时.
-
spine-glfw, OpenGL +3.3 运行时, 附带了 GLFW 示例项目.
-
spine-sfml, SFML运行时.
以下章节简要介绍了引擎无关的spine-cpp运行时及其使用方式. 大多数基于spine-cpp的官方Spine运行时都会将spine-cpp的API(部分)封装于其更易使用的自有API中. 因此对更底层一些的spine-cpp运行时有基础了解仍然是有益无害的.
导出spine-cpp适用的Spine资产
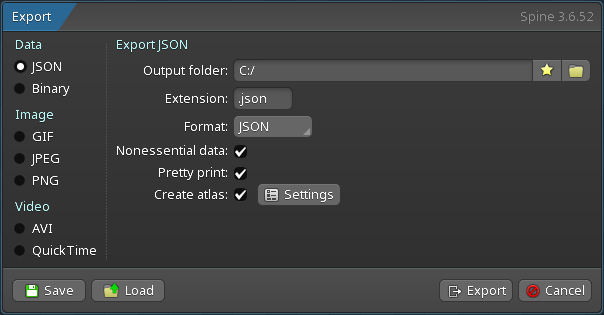
请按照Spine用户指南中的操作步骤, 了解如何:
- 将skeleton & 动画数据导出为JSON或二进制格式
- 导出包含skeleton图像的texture atlases
导出的skeleton数据和texture atlas将产生以下文件:
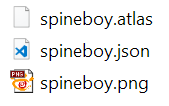
skeleton-name.json或skeleton-name.skel文件, 包含了skeleton和动画数据.skeleton-name.atlas, 包含了texture atlas的相关信息.- 一张或多张
.png文件, 每一个文件表示texture atlas中的一页, 每个页则指打包成页的skeleton所引用的图像.
注意: 使用
.skel二进制格式能使资产文件尺寸更小且加载更快.
注意: 也可以不用每个skeleton就生成一个texture atlas的打包方式, 而是将多个skeleton的图像打包成一个texture atlas. 关于此请参考texture 打包指南.
加载 Spine 资产
spine-cpp提供了加载texture atlases, Spine skeleton数据(骨骼、槽位、附件、皮肤、动画)和通过动画状态数据定义动画间mix时间的API. 这三种类型的数据, 也被称为setup pose数据, 通常加载一次后就能被每个游戏对象(game object)共享. 共享机制是通过赋予每个游戏对象其不同的Skelton和动画状态来实现的, 亦可称其为实例数据.
注意: 关于全局加载架构的更详细描述, 请参考更通用的 Spine 运行时文档.
加载 texture atlases
Texture atlas数据以自有的 atlas格式存储, 它描述了atlas页中各图像的位置. atlas页本身以普通的.png文件的形式存在atlas文件旁边.
Atlas 类为该功能提供了一个从磁盘加载atlas文件的构造函数和一个从原始内存数据加载atlas文件的构造函数. 若atlas加载失败, 则将在调试模式下触发一条断言.
using namespace spine;
// Load the atlas from a file. The last argument is engine specific and is responsible
// for loading the image of each texture atlas page and converting it to an engine
// specific texture or material which can be used for rendering.
Atlas* atlas = new Atlas("myatlas.atlas", textureLoader);
// Load the atlas from memory, giving the memory location, the number
// of bytes and the directory relative to which atlas page textures
// should be loaded.
Atlas* atlas = new Atlas(atlasInMemory, atlasDataLengthInBytes, dir, textureLoader);
加载 skeleton 数据
Skeleton数据(骨骼、槽、约束、附件、皮肤、动画)可导出为人类可读的JSON文件或二进制格式. spine-cpp在SkeletonData类实例中存储Skelton数据.
为加载从JSON导出的Skelton数据, 应创建一个SkeletonJson实例来接收先前加载的Atlas类, 设置skeleton的比例, 最后再从文件中读取skeleton数据:
using namespace spine;
// Create a SkeletonJson used for loading and set the scale
// to make the loaded data two times as big as the original data
SkeletonJson json(atlas);
json.setScale(2);
// Load the skeleton .json file into a SkeletonData
SkeletonData* skeletonData = json.readSkeletonDataFile(filename);
// If loading failed, print the error and exit the app
if (!skeletonData) {
printf("%s\n", json.getError().buffer());
exit(0);
}
加载二进制格式的skeleton数据的工作流程是相同的, 只是要记得用SkeletonBinary来代替SkeletonJson:
// to make the loaded data two times as big as the original data
SkeletonBinary binary(atlas);
binary.setScale(2);
// Load the skeleton .skel file into a SkeletonData
SkeletonData* skeletonData = binary.readSkeletonDataFile(filename);
// If loading failed, print the error and exit the app
if (!skeletonData) {
printf("%s\n", binary.getError().buffer());
exit(0);
}
准备动画状态数据
当从一个动画切换到另一个动画时, Spine 可进行平滑过渡(淡入淡出). 淡入淡出(crossfades)是通过在指定mix时间内将一个动画与另一个动画混合(mix)来实现的. spine-cpp 运行时提供了结构体 AnimationStateData 来定义这些mix时间:
using namespace spine;
// Create the spAnimationStateData
AnimatonStateData* animationStateData = new AnimationStateData(skeletonData);
// Set the default mix time between any pair of animations in seconds.
animationStateData->setDefaultMix(0.1f);
// Set the mix time between from the "jump" to the "walk" animation to 0.2 seconds,
// overwriting the default mix time for this from/to pair.
animationStateData->setMix("jump", "walk", 0.2f);
AnimationStateData 中定义的mix时间也可以在应用动画时被显式覆盖(见下文).
Skeletons
Setup pose数据(skeleton数据, texture atlases等)应该在游戏对象间共享. spine-cpp中的共享由Skeleton类来实现. 每个游戏对象都会收到自己的Skeleton实例, 它反过来引用了SkeletonData和Atlas实例作为数据源.
Skeleton可以自由修改, 例如通过程序化修改skeleton、应用动画或设置游戏对象的特定附件和皮肤, 而底层skeleton数据和texture atlas保持不变. 这样就能让任意数量的游戏对象来共享SkeletonData和Atlas实例.
创建 skeletons
创建 Skeleton 实例可以这么写:
每个游戏对象都需要自己的Skeleton实例. 大部分数据储存在SkeletonData和Atlas中, 并由所有Skeleton实例共享, 以最大程度减少内存消耗和texture切换开销. 因此一个Skeleton的生命周期与其对应的游戏对象的生命周期几近同步.
骨骼(Bones)
Skeleton包含了骨骼的层次结构, 槽位附着于骨骼, 而附件附加于槽位.
查找骨骼
Skeleton中的所有骨骼均以其唯一名称命名, 可通过该名称从skeleton中获取骨骼:
Bone* bone = skeleton->findBone("mybone");
本地变换(local transform)
一根骨骼受其父骨骼的影响, 该限制可一直追溯自根骨骼. 例如, 当旋转一块骨骼时, 其全部子骨骼和子骨骼的全部子骨骼也会被旋转. 为了完成这些层次化变换, 每块骨骼都存储了相对于其父骨骼的本地变换, 包括:
- 相对于父骨骼的
x和y位置. rotation角度.scaleX和scaleY.shearX和shearY角度.
骨骼的本地变换可随程序代码或应用动画而改变. 前者允许实现动态行为, 比如让骨骼指向鼠标的光标位置, 让脚部骨骼跟随地形移动等等. 对本地变换的程序性更改和应用动画可以同时进行. 最终的结果将是组合出的单一本地变换.
世界变换(World transform)
一旦设置了所有的本地变换, 无论是通过程序还是通过应用动画来修改骨骼的本地变换, 最终都需要每块骨骼的世界变换来进行渲染和物理计算.
计算从根骨骼开始, 然后递归地计算所有子骨骼的世界变换. 该计算同时计入了你的美术同事在Spine编辑器中定义的IK、变换(transform)和路径(path)约束.
计算世界变换, 需要首先要对物理运动更新Skeleton的帧时间, 再计算实际变换:
skeleton->updateWorldTransform(spine::Physics_Update);
deltaTime 指定当前帧和上一帧间经过的时间, 单位为秒. spSkeleton_updateWorldTransform 的第二个参数指定是否以及如何应用物理运动. SP_PHYSICS_UPDATE 已经是一个较好的默认值.
计算结果将存储在每块骨骼上, 包含如下部分:
a,b,c, 和d: 一个2x2的列主序矩阵(矩阵中同列元素在内存中相邻), 其编码了骨骼的旋转量、缩放量和剪切量.worldX,worldY: 骨骼的世界位置.
注意worldX和worldY是相对于skeleton->getX()和skeleton->getY()的偏移量. 后两个属性用于在游戏引擎的世界坐标系中定位skeleton.
一般来说不应直接修改骨骼的世界变换. 且它们应仅通过调用Skeleton::updateWorldTransform()从skeleton的本地变换中获取. 本地变换可以通过程序设置, 例如设置骨骼旋转量使其指向鼠标光标, 或者通过应用动画(详见下文)来设置, 两者亦可同时生效. 一旦应用了(程序性)动画, 就会调用Skeleton::updateWorldTransform(), 并根据本地变换及全部用于该骨骼的约束来重新计算产生的世界变换.
坐标系转换
在世界坐标系中操作骨骼通常比较容易, 因为这些坐标通常是由其他实体或输入事件给出. 然而由于亦不应直接更改世界变换, 我们需要将基于世界坐标系计算的任何骨骼变化应用于该骨骼的本地变换.
spine-cpp运行时提供了一些函数, 用于从骨骼的2x2世界变换矩阵中提取旋转和缩放信息, 并将位置和旋转从本地空间变换到世界空间, 或进行其逆变换. 所有这些函数都假定骨骼的世界变换已经通过调用Skeleton::updateWorldTransform()经过了计算更新:
// Get the rotation of a bone in world space relative to the world space x-axis in degrees
float rotationX = bone->getWorldRotationX();
// Get the rotation of a bone in world space relative to the world space y-axis in degrees
float rotationY = bone->getWorldRotationY();
// Get the scale of a bone in world space relative to the world space x-axis
float scaleX = bone->getWorldScaleX();
// Get the scale of a bone in world space relative to the world space y-axis
float scaleY = bone->getWorldScaleY();
// Transform a position given in world space to a bone's local space
float localX = 0, localY = 0;
bone->worldToLocal(worldX, worldY, localX, localY);
// Transform a position given in a bone's local space to world space
float worldX = 0, worldY = 0;
bone->localToWorld(localX, localY, worldX, worldY);
// Transform a rotation given in the world space to the bone's local space
float localRotationX = bone->worldToLocalRotation(bone)
注意: 在下一次调用
Skeleton::updateWorldTransform()后, 对骨骼(及其所有子骨骼)的本地变换的修改才会反映在骨骼的世界变换上.
定位(Positioning)
默认情况下, 一个skeleton默认位于游戏中世界坐标系的原点. 要在游戏的世界坐标系中定位skeleton可以使用x和y属性:
skeleton->setX(myGameObject->worldX);
skeleton->setY(myGameObject->worldY);
注意: 在下一次调用
Skeleton::updateWorldTransform()后, 对skeleton的x和y属性的修改才会反映在skeleton的世界变换上.
翻转(Flipping)
一个skeleton可以进行垂直或水平翻转. 这样就可以把为某个方向制作的动画用于相反的方向, 或者在Y轴朝下的坐标系中开展工作(Spine默认为Y轴向上):
skeleton->setScaleX(-1);
// flip horizontally around the y-axis
skeleton->setScaleY(-1);
注意: 在下一次调用
Skeleton::updateWorldTransform()后, 对skeleton的scaleX和scaleY属性的修改才会反映在skeleton的世界变换上.
设置皮肤
创建Spine skeleton的美术同事可能为skeleton添加了多个皮肤, 以丰富同一个skeleton的视觉变化, 例如一个包含不同性别的skeleton. spine-cpp运行时将皮肤存储在Skin类的实例中.
运行时中的一个皮肤本质是一个映射, 它定义了哪个附件进入skeleton的哪个槽位. 每个skeleton至少有一个皮肤, 它定义了哪个附件在skeleton的setup pose中的哪个槽上. 此外, 皮肤也有独自的名称来互相区分.
用spine-cpp在一个skeleton上设置一个皮肤可以这么写:
skeleton->setSkin("my_skin_name");
// set the default setup pose skin by passing NULL
skeleton->setSkin(NULL);
注意: 设置皮肤会影响到之前已经设置的皮肤和附件. 请参考通用运行时指南, 了解关于设置皮肤的更多信息.
设置附件
spine-cpp允许在skeleton的槽位上直接设置一个附件, 比如可以用来切换武器. 运行时将先在活动皮肤中搜索该附件, 如果搜索失败, 则在默认的setup pose皮肤中搜索:
skeleton->setAttachment("hand", "sword");
// Clear the attachment on the slot "hand" so nothing is shown
skeleton->setAttachment(skeleton, "hand", "");
着色(Tinting)
你可以通过设置skeleton的颜色来给该skeleton中的所有附件着色:
skeleton->getColor().set(1, 0, 0, 0.5f);
注意: spine-cpp中的颜色是以RGBA的形式给出的, 各通道的取值范围为[0-1].
当渲染一个skeleton时, 渲染器会遍历skeleton上的槽位的绘制顺序, 并在每个槽位上渲染当前活动的附件. 除了skeleton的颜色之外, 每个槽位也有自己的颜色属性可供运行时操作:
slot->getColor().set(1, 0, 1, 1);
请注意槽位的颜色也可以被动画影响. 若你手动更改了一个槽位的颜色, 然后应用了一个key了该槽位颜色的动画, 那么你手动设置的颜色将被覆盖.
应用动画
美术同事可通过Spine编辑器创建多个命名唯一的动画. 一个动画是一组时间轴. 每条时间轴指定了在哪一帧, 骨骼或skeleton的什么属性应该改变成哪个值. 时间轴有许多不同的类型, 从定义骨骼随时间变化的时间轴, 到改变绘制顺序的时间轴都有. 时间轴是skeleton数据的一部分, 存储在spine-cpp中SkeletonData的Animation实例中.
时间轴 API
如果需要直接处理时间轴, spine-cpp提供了一个时间轴API. 这个底层功能让你可以自由定制美术同事捣鼓出的动画以何种方式应用于skeleton.
动画状态 API
在几乎所有情况下, 都建议使用动画状态API而非时间轴API. 与底层的时间轴API相比, 动画状态API会让诸如在某段时间内应用动画、排队动画、mix动画、以及同时应用多个动画等任务变得更加容易. 动画状态API内部使用的也是时间轴API, 因此可以将其看作是时间轴API的封装器.
spine-cpp用 AnimationState 类表示动画状态. 就像skeleton一样, 每个游戏对象都要实例化一个AnimationState. 一般来说, 你游戏中每个游戏对象都有一个Skeleton和一个AnimationState实例. 与Skeleton类最类似的是, AnimationState也与其他全部 AnimationState 实例共享 SkeletonData(存储了动画及其时间轴)和AnimationStateData(存储了mix时间), 它们均源自同一组skeleton数据.
创建动画状态
创建AnimationState实例的写法是:
该函数接收一个通常在加载skeleton数据时创建的AnimationStateData实例, 它定义了默认的mix时间以及特定动画间淡入淡出的mix时间.
轨道 & 队列
一个动画状态实例管理着一个或多个轨道. 每条轨道本质是一个动画的列表, 这些动画按它们被添加到轨道中的顺序来进行回放. 这一行为被称为队列. 轨道的索引始于0.
你可以像这样在一条轨道上队列一个动画:
int track = 0;
bool loop = true;
float delay = 0;
animationState->addAnimation(track, "walk", loop, delay);
可以一次队列多个动画, 以一种射后不管(fire and forget)的方式创建动画序列:
animationState->addAnimation(0, "walk", true, 0);
// Jump after 3 seconds
animationState->addAnimation(0, "jump", false, 3);
// Once we are done jumping, idle indefinitely
animationState->addAnimation(0, "idle", true, 0);
也可以清空一条轨道中队列着的所有动画:
animationState->clearTrack(0);
// Clear all animations queued on all tracks
animationState->clearTracks(animationState);
你可以调用AnimationState::setAnimation()来清空队列并添加新动画到轨道上. 该操作将清空所有轨道, 但请记住清空前最后播放的动画是什么, 再淡出到新设置的动画. 这样你才可以顺利地从一个动画序列过渡到下一个. 在调用AnimationState::setAnimation()后, 你仍可以通过调用AnimationState::addAnimation()向轨道添加更多的动画:
// to the "shot" animation, which should not be looped (last parameter).
animationState->addAnimation(0, "shot", false, 0);
// After shooting, we want to idle again
animationState->addAnimation(0, "idle", true, 0);
要从一个动画过渡切换到skeleton的setup pose, 可以使用AnimationState::setEmptyAnimation(), AnimationState::addEmptyAnimation(), 前者清空当前轨道并淡出到skeleton, 后者将入队一个到setup pose的淡入作为轨道上动画序列的一部分:
// to the setup pose for 0.5 seconds (mix time).
animationState->setEmptyAnimation(0, 0.5f);
// Add a crossfade to the setup pose for 0.5 seconds as part of the animation
// sequence in track 0, with a delay of 1 second.
animationState->addEmptyAnimation(0, 0.5f, 1)
规模不大的游戏使用一条轨道通常就足够. 更复杂的游戏可能希望在不同的轨道上队列动画, 例如在射击时同时播放一个步行动画. 而这就是Spine能展示其真正实力之处:
animationState->setAnimation(0, "walk", true);
// Simultaneously apply a "shot" animation on track 1 once.
animationState->setAnimation(1, "shot", false);
请注意, 若如上文所写的方式同时应用多个动画, 高轨道上的动画将覆盖低轨道上的动画, 因为这两个动画都key进了每个值. 因此动画师应当注意, 要确保两个要同时播放的动画不会在skeleton中key进相同的值, 例如相同的骨骼、附件或颜色等. 加性动画融合(Additive animation blend)可以把时间轴上不同轨道但影响同一Skelton属性的结果加在一起.
你可以通过轨道条目(Track Entries)控制不同轨道上的动画mix
轨道条目(Track Entries)
每当你在一个动画状态的轨道上入队一个动画, 相应函数将返回一个TrackEntry实例. 这个轨道条目实例可以进一步定制队列动画, 以及它与同一或不同轨道上的动画的mix行为. 完整的API请参见TrackEntry 文档.
举个例子, 让我们假设 AnimationStateData中包含了"walk"和"run"两个动画, 这两个动画间的mix时间对于某个游戏对象现在是过长的. 你可以临时修改"walk"和"run"之间的mix时长, 只特别针对这两个队列中的动画作出设置:
sanimationState->setAnimation(0, "walk", true);
// At some point, queue the run animation. We want to speed up the mixing
// between "walk" and "run" defined in the `AnimationStateData` (let's say 0.5 seconds)
// for this one specific call to be faster (0.1 seconds).
TrackEntry* entry = animationState->addAnimation(0, "run", true, 0);
entry->setMixDuration(0.1f);
你可以一直保存TrackEntry来在不同时机对其进行修改. 只要该轨道上还队列着动画, TrackEntry实例就会一直有效. 只有动画播放完成, TrackEntry才会失效. 后续对其进行任何访问都是非法的, 并可能导致存储器段错误(segfault). 你可以注册一个监听器, 以便在动画和轨道条目失效时获得及时的通知.
事件
一个动画状态实例在播放队列动画时将产生事件, 以通知监听器如下状态更改:
- 动画播放 开始(started).
- 动画播放 中断(interrupted), 例如清空了一条轨道.
- 动画播放 完成(completed), 如果循环播放动画则该事件会多次触发.
- 动画播放 结束(ended), 既可能缘于动画播放中断亦可能是非循环动画播放完成.
- 动画及其对应
TrackEntry已被 释放(disposed) 且不再可用. - 触发了 用户自定义的 事件(event).
你可以注册一个函数来监听这些事件, 这个函数可以注册到动画状态,也可以注册到动画状态返回的TrackEntry实例上.
void callback (AnimationState* state, EventType type, TrackEntry* entry, Event* event) {
const String& animationName = (entry && entry->getAnimation()) ? entry->getAnimation()->getName() : String("");
switch (type) {
case EventType_Start:
printf("%d start: %s\n", entry->getTrackIndex(), animationName.buffer());
break;
case EventType_Interrupt:
printf("%d interrupt: %s\n", entry->getTrackIndex(), animationName.buffer());
break;
case EventType_End:
printf("%d end: %s\n", entry->getTrackIndex(), animationName.buffer());
break;
case EventType_Complete:
printf("%d complete: %s\n", entry->getTrackIndex(), animationName.buffer());
break;
case EventType_Dispose:
printf("%d dispose: %s\n", entry->getTrackIndex(), animationName.buffer());
break;
case EventType_Event:
printf("%d event: %s, %s: %d, %f, %s\n", entry->getTrackIndex(), animationName.buffer(), event->getData().getName().buffer(), event->getIntValue(), event->getFloatValue(),
event->getStringValue().buffer());
break;
}
fflush(stdout);
}
// Register the function as a listener on the animation state. It will be called for all
// animations queued on the animation state.
animationState->setListener(myListener);
// Or you can register the function as a listener for events for a specific animation you enqueued
TrackEntry* trackEntry = animationState->setAnimation(0, "walk", true);
trackEntry->setListener(myListener);
用户自定义的事件可以完美地匹配动画中应该播放声音的时刻, 例如播放脚步声.
在监听器中对动画状态的改变, 比如设置一个新的动画, 只有直到下一次调用AnimationState::apply时才会应用于skeleton. 你也可以立即在监听器中应用这些更改:
if (somecondition) {
state->setAnimation(0, "run", false);
state->update(0);
state->apply(skeleton);
}
}
应用动画状态
动画状态本身是基于时间的. 你需要每隔一段时间就更新一次来推进其状态, 只需提供自上次更新以来的时间间隔, 以秒为单位:
这将推进每个轨道上的动画播放, 协调淡入淡出, 并调用任何你可能已注册的监听器.
在更新动画状态后, 要把它应用到skeleton上以更新其骨骼的本地变换、附件、槽位颜色、绘制顺序和任何其他可以被动画化的数值:
摆好了skeleton的姿势并播放了动画后, 最后你需要更新其骨骼的世界变换, 为渲染或物理运动做好准备:
skeleton->updateWorldTransform();
结合以上全部功能
下面是一个简单示例, 展示了如何将上述全部内容组合在一起, 包括加载和为应用动画实例化(滚动鼠标滚轮以查看全部代码):
Atlas* atlas;
SkeletonData* skeletonData;
AnimationStateData* animationStateData;
// 5 skeleton instances and their animation states
Skeleton* skeleton[5];
AnimationState* animationState[5];
char* animationNames[] = { "walk", "run", "shot" };
void setup() {
// setup your engine so textures can be loaded for atlases, create a window, etc.
engine_setup();
// Load the texture atlas
atlas = new Atlas("spineboy.atlas", MyEngineTextureLoader());
if (atlas.getPages().size() == 0) {
printf("Failed to load atlas");
delete atlas;
exit(0);
}
// Load the skeleton data
SkeletonJson json(atlas);
skeletonData = json.readSkeletonDataFile("spineboy.json");
if (!skeletonData) {
printf("Failed to load skeleton data");
delete atlas;
exit(0);
}
// Setup mix times
animationStateData = new AnimationStateData(skeletonData);
animationStateData->setDefaultMix(0.5f);
animationStateDAta->setMix("walk", "run", 0.2f);
animationStateData->setMix("walk", "shot", 0.1f);
}
void mainLoop() {
// Create 5 skeleton instances and animation states
// representing 5 game objects
for (int i = 0; i < 5; i++) {
// Create the skeleton and put it at a random position
Skeleton* skeleton = new Skeleton(skeletonData);
skeleton->setX(random(0, 200));
skeleton->setY(random(0, 200));
// Create the animation state and enqueue a random animation, looping
AnimationState *animationState = new AnimationState(animationStateData);
animationState->setAnimation(0, animationNames[random(0, 3)], true);
}
while (engine_gameIsRunning()) {
engine_clearScreen();
// update the game objects
for (int i = 0; i < 5; i++) {
Skeleton* skeleton = skeletons[i];
AnimationState* animationState = animationStates[i];
// First update the animation state by the delta time
animationState->update(engine_getDeltaTime());
// Next, apply the state to the skeleton
animationState->apply(skeleton);
// Update the skeleton's frame time for physics
skeleton->update(engine_getDeltaTime());
// Calculate world transforms for rendering
skeleton->updateWorldTransform();
// Hand off rendering the skeleton to the engine
engine_drawSkeleton(skeleton);
}
}
// Dispose of the instance data. Normally you'd do this when
// a game object is disposed.
for (int i = 0; i < 5) {
delete skeletons[i];
delete animationStates[i];
}
}
void dispose() {
// dispose all the shared resources
delete atlas;
delete skeletonData;
delete animationStateData;
}
int main(int argc, char* argv) {
setup();
mainLoop();
dispose();
}
请注意setup pose数据(Atlas, SkeletonData, AnimationStateData)和实例数据(Skeleton, AnimationState)间的区别及其不同的生命周期.
内存管理
我们试图让spine-cpp的内存管理尽可能的简单明了. 任何通过new关键字分配内存的类或结构体都需要通过相应delete关键字来释放内存. 类实例的生命周期取决于它是哪种类的实例. 经验上应遵循如下一般原则:
- 在游戏或关卡启动时创建由实例数据(
Atlas,SkeletonData,AnimationStateData)共享的setup pose数据, 在游戏或关卡结束时释放掉它. - 在创建相应的游戏对象时创建实例数据 (
Skeleton,AnimationState), 在销毁游戏对象时释放它.
轨道条目(TrackEntry)从调用一个入队动画状态函数(AnimationState::setAnimation(), AnimationState::addAnimation(), AnimationState::setEmptyAnimation(), AnimationState::addEmptyAnimation())到EventType_dispose事件被发送到你的监听器的这段时间里一直有效. 在此事件触发后再访问轨道条目则会导致存储器段错误.
在创建结构体时, 经常将其他结构体作为引用传入. 而引用它的结构体将永远不会释放被引用的结构体. 例如Skeleton引用了 SkeletonData, 而后者又引用了Atlas.
- 释放
Skeleton不会释放SkeletonData和Atlas. 该设计有其缘由, 盖因SkeletonData可能正被其他Skeleton实例所共享. - 释放
SkeletonData将不会释放Atlas. 这该设计亦有其缘由, 因为Atlas可能正被其他SkeletonData实例共享, 例如: 一个atlas包含了多个skeleton的图像.
如果你使用了一个自定义的内存分配器, 你可以通过实现你自己的SpineExtension类来覆盖Spine的分配方式. 你的自定义SpineExtension可以从DefaultSpineExtension派生, 且应重载_alloc、_calloc、_realloc和_free(继承了_readFile的实现). 然后你可以在程序启动时调用spine::SpineExtension::setInstance()来设置扩展类. 此外若你没有使用Spine运行时引擎集成, 你必须实现spine::getDefaultExtension()方法, 以便为Spine提供一个与你的引擎的内存管理和文件管理兼容的扩展.
Spine还在spine/Debug.h中以SpineExtension包装类的形式提供了一个简单的内存泄漏检测器, 名为DebugExtension. 将DebugExtension包装进另一个扩展类就能让调试扩展跟踪内存分配、文件位置和行号, 不过你需要这样分配Spine对象:
__FILE__和__LINE__参数被调试扩展用来跟踪内存分配发生的位置. 当程序退出时, 你可以让调试扩展输出一份报告到stdout.
#include <spine/Debug.h>
static DebugExtension *debugExtension = NULL;
// This will be used by Spine to get the initial extension instance.
SpineExtension* spine::getDefaultExtension() {
// return a default spine extension that uses standard malloc for memory
// management, and wrap it in a debug extension.
debugExtension = new DebugExtension(new DefaultSpineExtension());
return debugExtension;
}
int main (int argc, char** argv) {
... your app code allocating Spine objects via `new (__FILE__, __LINE__) SpineClassName()` and deallocating via `delete instance` ...
debugExtension->reportLeaks();
}
将 spine-cpp 整合进自研引擎
集成源代码
spine-cpp由一组C++头文件和实现文件组成, 源码可在运行时的Git仓库中spine-cpp/spine-cpp文件夹下找到. 你可以将源码复制到项目中, 也可以使用 CMake 的 FetchContent.
复制源码
- 克隆Spine运行时仓库或使用适配于 Spine 编辑器的 分支版本.
- 将 spine-cpp/spine-cpp/src/spine 文件夹下的文件 include 到你的构建设置中.
- 将 spine-cpp/spine-cpp/include 文件夹添加到你的头文件搜索路径中.
Make的 FetchContent
从 Spine 4.2 开始, 还支持使用 CMake 的 FetchContent 功能轻松地将 spin-cpp 运行时集成到项目中, 如本例中的 CMakeLists.txt 文件所示:
project(MyProject C)
set(CMAKE_C_STANDARD 99)
set(CMAKE_C_STANDARD_REQUIRED ON)
set(FETCHCONTENT_QUIET NO)
# Fetch the spine-runtimes repository and make the spine-cpp library available
include(FetchContent)
FetchContent_Declare(
spine-runtimes
GIT_REPOSITORY https://github.com/esotericsoftware/spine-runtimes.git
GIT_TAG 4.2
GIT_SHALLOW TRUE
)
FetchContent_MakeAvailable(spine-runtimes)
FetchContent_GetProperties(spine-runtimes)
if(NOT spine-runtimes_POPULATED)
FetchContent_Populate(spine-runtimes)
endif()
add_subdirectory(${spine-runtimes_SOURCE_DIR}/spine-c ${CMAKE_BINARY_DIR}/spine-runtimes)
# Create a simple C++ executable
file(GLOB SOURCES "src/*.cpp")
add_executable(MyExecutable ${SOURCES})
target_include_directories(MyExecutable PRIVATE src/)
# Link the spine-cpp library
target_link_libraries(MyExecutable spine-cpp)
实现内存和文件I/O
When compiling your project, you may encounter linker errors for the functions that the spine-cpp runtime expects you to implement. For example, compiling with Clang might yield: 编译项目时, spine-cpp运行时期望你实现的函数若尚未被实现, 链接器(linker)将会报错. 以下是一个Clang编译器的错误输出示例:
"spine::getDefaultExtension()", referenced from:
spine::SpineExtension::getInstance() in libspine-cpp.a(Extension.cpp.o)
ld: symbol(s) not found for architecture x86_64
clang: error: linker command failed with exit code 1 (use -v to see invocation)
链接器找不到负责返回 SpineExtension 的函数. spin-cpp 运行时希望你用引擎 API 实现一个从 SpineExtension 派生的类. 该扩展的定义在 Extension.h 中可见.
若你对基于 malloc, free 和 FILE 的文件I/O并无反感, 则可以使用 DefaultSpineExtension 并按如下写法实现缺失的函数:
spine::SpineExtension *spine::getDefaultExtension() {
return new spine::DefaultSpineExtension();
}
如若不然, 你则需要从 SpineExtension 或 DefaultSpineExtension 派生自己的类, 并重载_malloc、_calloc、_realloc、_free和_readFile方法.
实现TextureLoader
spine-cpp的 Atlas 类希望传入一个 TextureLoader 实例来加载和创建单个atlas页并在引擎中显示texture. TextureLoader 类有两个方法, load是一个用于加载给定路径的atlas页的方法, 而unload则负责释放texture.
load函数通过将 texture 赋值给 AtlasPage::texture 便能将texture存储在atlas页中. 这使得稍后可以很容易地通过atlas页中的区域来访问texture.
load函数的path参数是页图像文件的路径, 该路径可以是传递给Atlas构造函数的.atlas文件的相对路径, 也可以相对于第二个从内存加载atlas的Atlas构造函数的dir参数.
这里假定你的引擎提供了如下的API来处理texture:
// ... OpenGL handle, image data, whatever ...
int width;
int height;
};
Texture* engine_loadTexture(const char* file);
void engine_disposeTexture(Texture* texture);
那么实现TextureLoader就很简单了:
class MyTextureLoader: public TextureLoader {
public:
TextureLoader() { }
virtual ~TextureLoader() { }
// Called when the atlas loads the texture of a page.
virtual void load(AtlasPage& page, const String& path) {
Texture* texture = engine_loadTexture(path);
// if texture loading failed, we simply return.
if (!texture) return;
// store the Texture on the rendererObject so we can
// retrieve it later for rendering.
page.texture = texture;
}
// Called when the atlas is disposed and itself disposes its atlas pages.
virtual void unload(void* texture) {
// the texture parameter is the texture we stored in the page via page->setRendererObject()
engine_disposeTexture(texture);
}
}
这时得到的texture加载器实例就可以传入任一Atlas构造函数中.
实现渲染
渲染Spine skeleton意味着以当前的绘制顺序渲染所有当前活动的附件. 绘制顺序本质是skeleton上的一个槽位数组. 此外, 剪切附件也能剪切区域和网格附件
spine-cpp provides the SkeletonRenderer class to easily generate textured, vertex-colored, blended triangle meshes from a skeleton's active attachments, which you can then render with your engine of choice. spin-cpp 提供了 SkeletonRenderer 类, 可以从skeleton的活动附件中轻松生成textture、顶点色、混合(blended)三角网格, 然后你就可以用你喜欢的引擎进行渲染了.
如果你的引擎支持以下 API:
struct Vertex {
// Position in x/y plane
float x, y;
// UV coordinates
float u, v;
// Packed RGBA color
uint32_t color;
};
enum BlendMode {
// See /git/spine-runtimes/blob/spine-libgdx/spine-libgdx/src/com/esotericsoftware/spine/BlendMode.java#L37
// for how these translate to OpenGL source/destination blend modes.
BLEND_NORMAL,
BLEND_ADDITIVE,
BLEND_MULTIPLY,
BLEND_SCREEN,
}
// Draw the given mesh.
// - vertices is a pointer to an array of Vertex structures
// - indices is a pointer to an array of indices. Consecutive indices of 3 form a triangle.
// - numIndices the number of indices, must be divisble by 3, as there are 3 vertices in a triangle.
// - texture the texture to use
// - blendMode the blend mode to use
void engine_drawMesh(Vertex* vertices, unsigned short* indices, size_t numIndices, Texture* texture, BlendMode blendmode);
那么渲染过程的实现可以这样写:
spine::Vector<Vertex> vertices;
// A single SkeletonRenderer instance (assuming rendering is performed single-threaded)
SkeletonRenderer skeletonRenderer;
void drawSkeleton(Skeleton &skeleton) {
RenderCommand *command = skeletonRenderer.render(skeleton);
while (command) {
Vertex vertex;
float *positions = command->positions;
float *uvs = command->uvs;
uint32_t *colors = command->colors;
uint16_t *indices = command->indices;
Texture *texture = (Texture *)command->texture;
for (int i = 0, j = 0, n = command->numVertices * 2; i < n; ++i, j += 2) {
vertex.x = positions[j];
vertex.y = positions[j + 1];
vertex.u = uvs[j];
vertex.v = uvs[j + 1];
vertex.color = colors[i];
vertices->add(vertex);
}
BlendMode blendMode = command->blendMode; // Spine blend mode equals engine blend mode
engine_drawMesh(vertices->buffer(), command->indices, command->numIndices, texture, blendMode)
vertices.clear()
command = command->next;
}
}
SkeletonRenderer::render() 会返回 RenderCommand 实例的链表. 每个 RenderCommand 表示一个网格, 其中包含顶点、索引、blend模式和texture. 使用引擎渲染某个 RenderCommand 的时候, 请将顶点转换为所需格式, 设置blend模式和texture, 再绘制转换后的顶点和索引. 其他RenderCommand也如法炮制即可, 使用 RenderCommand::next 就能迭代这些链表节点.
如果网格的数个附件的blend模式和texture完全相同, SkeletonRenderer 可以将它们合批到一个RenderCommand 中, 从而最大限度地降低引擎的绘制调用数, 而你无需自己来实现合批处理.
上文中的实现支持除双色着色外的全部Spine功能. 请查看 spine-glfw 运行时以获取基于OpenGL的实现示例.