
spine-sfml运行时文档
Licensing
在将 Spine 运行时集成到你的应用程序之前, 请先阅读 Spine 运行时许可证.
开始使用
spine-sfml 是一个基于 C++ 的运行时, 用于通过 SFML 加载、操作和渲染 Spine skeleton.
spine-sfml 需要 SFML 2.6+ 版本, 并支持全部 Spine 功能.
安装
spine-sfml 运行时以 C++ API 的形式提供, 基于通用的 spine-cpp 运行时.
使用CMake集成 (推荐)
将 spine-sfml 集成到你的项目中最简单的方法是通过 CMake FetchContent:
project(MySpineProject)
include(FetchContent)
FetchContent_Declare(
spine-sfml
GIT_REPOSITORY https://github.com/esotericsoftware/spine-runtimes.git
GIT_TAG 4.3
SOURCE_SUBDIR spine-sfml
)
FetchContent_MakeAvailable(spine-sfml)
# Create your executable
add_executable(MyApp main.cpp)
# Link against spine-sfml
target_link_libraries(MyApp spine-sfml)
这将自动获取并构建 spine-sfml 及其所有依赖项 (spine-cpp 和 SFML).
手动集成
如果你更倾向于手动集成:
- 使用 git 下载 Spine Runtimes 源码 (
git clone https://github.com/esotericsoftware/spine-runtimes) 或下载为 zip 压缩文件. - 将所需的源文件添加到项目中:
- 添加
spine-cpp/src和spine-sfml/src/spine-sfml.cpp中的源文件
- 添加
- 添加包含目录:
spine-cpp/include和spine-sfml/src - 链接到 SFML 库 (sfml-graphics, sfml-window, sfml-system)
在你的 C++ 代码中, 包含以下头文件以访问 spine-sfml API:
注意: spine-sfml 构建于 SFML C++ 库之上, 因此 spine-sfml 不提供 C API.
示例
spine-sfml 示例可在 Windows、Linux 和 macOS 上运行. 详见 example/main.cpp.
Windows
- 安装 Visual Studio Community. 确保安装了 C++ 和 CMake 支持.
- 使用 git 下载 Spine Runtimes 仓库 (
git clone https://github.com/esotericsoftware/spine-runtimes) 或下载为 zip 压缩文件. - 打开 Visual Studio Community, 然后通过 Visual Studio Community 启动器中的 打开本地文件夹 按钮打开
spine-sfml/. - 等待 CMake 执行完成, 然后选择
spine-sfml-example.exe作为启动项目并开始调试.
Linux
-
安装依赖项:
bashsudo apt-get install cmake ninja-build libsfml-dev # Ubuntu/Debian
# or equivalent for your distribution -
克隆仓库:
git clone https://github.com/esotericsoftware/spine-runtimes -
构建并运行:
bashcd spine-runtimes/spine-sfml
./build.sh
./build/debug/spine-sfml-example
macOS
-
安装 Xcode
-
安装 Homebrew
-
安装依赖项:
bashbrew install cmake ninja -
克隆仓库:
git clone https://github.com/esotericsoftware/spine-runtimes -
构建并运行:
bashcd spine-runtimes/spine-sfml
./build.sh
./build/debug/spine-sfml-example
使用spine-sfml
spine-sfml 运行时支持通过 SFML 回放和操作使用 Spine 制作的动画. spine-sfml 运行时以 C++ 实现, 并基于通用的 spine-cpp 运行时. 它在 SFML API 之上提供了加载与渲染功能.
有关 Spine 运行时架构的详细说明, 请参阅 Spine 运行时指南; 有关使用 C++ 回放和操作 Spine 动画的核心 API, 请参阅 spine-cpp 文档.
为SFML导出资产
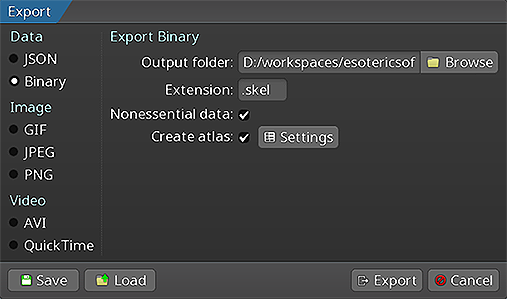 请参照 Spine 用户指南中的说明以了解如何:
导出 skeleton 数据和 skeleton 的 texture atlas 将生成以下文件:
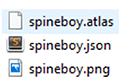
- 包含 skeleton 和动画数据的
skeleton-name.json或skeleton-name.skel文件. skeleton-name.atlas, 包含 texture atlas 的信息.- 一个或多个
.png文件, 每个文件代表 texture atlas 中的一页, 每页中都打包了 skeleton 将使用的图像.
加载Spine skeletons
spine-sfml 运行时使用 SFML 的渲染 API 来显示 skeleton. 在从导出的文件中加载 skeleton 之前, 必须先创建一个 sf::RenderWindow:
sf::RenderWindow window(sf::VideoMode(800, 600), "Spine SFML");
window.setFramerateLimit(60);
使用C++ API加载
spine-sfml 运行时提供了 SFMLTextureLoader 用于加载 texture:
spine::SFMLTextureLoader textureLoader;
// Load atlas
spine::Atlas atlas("data/spineboy-pma.atlas", &textureLoader);
// Load skeleton data from binary
spine::SkeletonBinary binary(atlas);
spine::SkeletonData *skeletonData = binary.readSkeletonDataFile("data/spineboy-pro.skel");
// Or load from JSON
spine::SkeletonJson json(atlas);
spine::SkeletonData *skeletonData = json.readSkeletonDataFile("data/spineboy-pro.json");
已加载的 skeleton 数据和 atlas 可以且应该在多个 skeleton 实例间共享, 如此便可减少内存占用, 并让共享同一份 atlas 数据的 skeleton 能够合批渲染.
渲染Skeletons
spine-sfml 提供了一个可直接作用于 skeleton 的简易渲染函数.
spine::Skeleton skeleton(*skeletonData);
spine::AnimationStateData animationStateData(*skeletonData);
spine::AnimationState animationState(animationStateData);
// Setup skeleton
skeleton.setPosition(400, 500);
skeleton.setScaleX(0.5f);
skeleton.setScaleY(0.5f);
skeleton.setupPose();
// Setup animation
animationStateData.setDefaultMix(0.2f);
animationState.setAnimation(0, "portal", false);
animationState.addAnimation(0, "run", true, 0);
// Update and render (in your main loop)
animationState.update(deltaTime);
animationState.apply(skeleton);
skeleton.update(deltaTime);
skeleton.updateWorldTransform(spine::Physics_Update);
// Clear and draw
window.clear(sf::Color::Black);
spine::SFML_draw(skeleton, window, true); // true for premultiplied alpha
window.display();
// Cleanup
delete skeletonData;
完整示例
以下是一个完整示例, 展示了如何使用 SFML 加载并渲染 Spine skeleton:
#include <SFML/Graphics.hpp>
int main() {
// Create SFML window
sf::RenderWindow window(sf::VideoMode(800, 600), "Spine SFML Example");
window.setFramerateLimit(60);
// Load atlas and skeleton
spine::SFMLTextureLoader textureLoader;
spine::Atlas atlas("data/spineboy-pma.atlas", &textureLoader);
spine::SkeletonJson json(atlas);
spine::SkeletonData* skeletonData = json.readSkeletonDataFile("data/spineboy-pro.json");
if (!skeletonData) {
printf("Failed to load skeleton data\n");
return 1;
}
// Create skeleton and animation state
spine::Skeleton skeleton(*skeletonData);
spine::AnimationStateData animationStateData(*skeletonData);
animationStateData.setDefaultMix(0.2f);
spine::AnimationState animationState(animationStateData);
// Setup skeleton
skeleton.setPosition(400, 500);
skeleton.setScaleX(0.5f);
skeleton.setScaleY(0.5f);
skeleton.setupPose();
// Setup animation
animationState.setAnimation(0, "portal", false);
animationState.addAnimation(0, "run", true, 0);
// Main loop
sf::Clock clock;
while (window.isOpen()) {
// Handle events
sf::Event event;
while (window.pollEvent(event)) {
if (event.type == sf::Event::Closed) {
window.close();
}
}
// Update animation
float deltaTime = clock.restart().asSeconds();
animationState.update(deltaTime);
animationState.apply(skeleton);
skeleton.update(deltaTime);
skeleton.updateWorldTransform(spine::Physics_Update);
// Clear and draw
window.clear(sf::Color::Black);
spine::SFML_draw(skeleton, window, true);
window.display();
}
// Cleanup
delete skeletonData;
return 0;
}
有关操作 skeleton 与动画状态的 API, 请参阅 spine-cpp 文档.
清理
当你不再需要 skeleton 和 atlas 数据时, 应释放其占用的内存:
delete skeletonData;
// Atlas is stack allocated in the examples above, so it will be automatically cleaned up
// If you allocated it with new, delete it:
// delete atlas;
注意: 销毁 skeleton 数据和 atlas 实例时, texture loader 会自动卸载其关联的 SFML texture.